Category: Snacks, Sauces And Drinks

  • Irresistibly Crunchy Homemade Caramel Corn Puffs for Any Occasion

    Irresistibly Crunchy Homemade Caramel Corn Puffs for Any Occasion

    Whip up a batch of these irresistibly crunchy homemade caramel corn puffs, a timeless treat perfect for movie nights, parties, or simply satisfying a sweet craving. This recipe guides you through creating a luscious, golden caramel that perfectly coats every fluffy kernel, baked to crispy perfection for a delightful texture in every bite.

    Ingredients

    • 1/2 cup (100g) popcorn kernels, unpopped (yielding about 12-16 cups popped)
    • 1/2 cup (113g) unsalted butter, cubed
    • 1 cup (200g) light brown sugar, firmly packed
    • 1/4 cup (60ml) light corn syrup
    • 1/2 teaspoon (2.5g) baking soda
    • 1 teaspoon (5ml) pure vanilla extract

    Instructions

    1. Pop Your Corn: Get ready with about 12 to 16 cups of fluffy popcorn. Ensure all unpopped kernels are sifted out, as they can be unpleasant to bite into.
    2. Craft the Caramel: In a sturdy, heavy-bottomed saucepan, combine the unsalted butter, firmly packed light brown sugar, and light corn syrup. Place over medium heat, stirring occasionally with a heatproof spatula until the butter has melted and the sugar has dissolved. Bring the mixture to a full boil, then let it gently bubble for 4 to 5 minutes. Watch for it to thicken and achieve a rich, amber hue, indicating it’s ready.
    3. Introduce Foaming Agents: Promptly remove the saucepan from the heat. Stir in the baking soda and pure vanilla extract. The mixture will vigorously foam up and expand due to the baking soda; continue stirring until it subsides slightly and the caramel becomes smooth, lighter in color, and creamy.
    4. Coat Evenly: Transfer your freshly popped popcorn into a very large, heatproof mixing bowl. Carefully pour the hot, prepared caramel sauce over the popcorn. Using two sturdy spatulas or a large spoon, gently but thoroughly toss and fold the popcorn, ensuring every single piece is beautifully coated with the luscious caramel. Work quickly before the caramel cools too much.
    5. Achieve Crispness: Evenly spread the caramel-coated popcorn in a single, thin layer across a large rimmed baking sheet that’s been lined with parchment paper. Bake in a preheated oven at 250°F (120°C) for 45-60 minutes, pausing every 15 minutes to gently stir and redistribute the popcorn. This step is crucial for achieving that signature crisp, non-sticky texture.
    6. Cool and Serve: Once baked to perfection, remove the baking sheet from the oven and allow the caramel corn to cool completely and undisturbed on the parchment paper. As it cools, it will firm up and become wonderfully crunchy. Once entirely cool and hard, break the large clusters into individual, bite-sized pieces for easy enjoyment.

    Pro Tips

    • Pre-Measure Everything: Caramel making moves quickly. Have all your ingredients measured and ready to go before you start melting anything.
    • Use a Heavy-Bottomed Pan: This prevents scorching the caramel, especially during the boiling phase.
    • Don’t Rush the Bake: The oven time is essential for drying out the caramel and achieving that perfect crunch. Stirring regularly helps prevent clumping.
    • Cool Completely: Resist the urge to snack too soon! The caramel corn hardens and becomes truly crunchy only after it’s fully cooled.

    Serving Suggestions

    • This caramel corn is fantastic on its own as a delightful snack.
    • Package it in decorative bags or jars for homemade gifts during holidays or special occasions.
    • Serve alongside a bowl of ice cream for a delightful textural contrast.
    • Crush lightly and sprinkle over brownies or cupcakes for an extra caramel crunch.

    Variations & Add-Ins

    • Nutty Crunch: Stir in 1-2 cups of roasted, salted peanuts, pecans, or almonds with the popcorn before coating with caramel.
    • Chocolate Drizzle: Once the caramel corn is completely cool and broken apart, drizzle with melted dark, milk, or white chocolate for an extra layer of indulgence.
    • Spiced Caramel: Add 1/2 teaspoon of cinnamon or a pinch of nutmeg to the caramel sauce during the boiling stage for a warming spice note.
    • Sea Salt Finish: Sprinkle a tiny pinch of flaky sea salt over the caramel corn right after it comes out of the oven for a gourmet sweet and salty touch.

    Yields: About 14-16 cupsPrep time: 22 minutesCook time: 55 minutes

    FAQs

    How do I prevent my caramel corn from becoming sticky?
    The baking step is crucial! Baking at a low temperature for an extended period dries out the caramel, ensuring a truly crunchy, non-sticky result. Make sure to cool it completely and store it in an airtight container.
    Can I use microwave popcorn for this recipe?
    Yes, you can, but ensure it’s plain, unsalted, and unbuttered microwave popcorn. Any added butter or salt can affect the caramel’s texture and flavor. It’s often better to pop kernels yourself for optimal control.
    What’s the best way to store caramel corn?
    Once completely cool, store your crunchy caramel corn in an airtight container at room temperature. This will keep it fresh and crisp for up to a week. Avoid refrigeration, as it can make the caramel sticky.
    Why did my caramel separate or turn grainy?
    Caramel can separate if it’s stirred too vigorously during the boiling phase, causing sugar crystals to form. Using corn syrup helps prevent this. Ensure your ingredients are at room temperature and avoid scraping the sides of the pan during cooking.
    Can I double this recipe for a larger batch?
    Yes, you can double the recipe. However, it’s recommended to use two separate large baking sheets to ensure the caramel corn bakes in a single, even layer, which is essential for uniform crunchiness. Do not overcrowd one sheet.
    What if I don’t have light corn syrup?
    Light corn syrup is important as it helps prevent sugar crystallization, resulting in a smooth caramel. While some recipes use substitutes like honey or golden syrup, the texture may vary slightly. For best results, it’s recommended to use corn syrup.
    How do I know when the caramel is ready?
    The caramel mixture should reach a full, rolling boil and thicken slightly, taking on a rich, amber color within 4-5 minutes. If you have a candy thermometer, it should reach around 240-250°F (115-121°C) for the ‘soft ball’ stage, though visual cues work well here.

    [redirect_script url=”aHR0cHM6Ly93d3cuY29va2luZ3dpdGhsb3JhLmNvbS9jcnVuY2h5LWNhcmFtZWwtY29ybi1wdWZmcy1yZWNpcGUtZm9yLXBhcnRpZXMvP3V0bV9zb3VyY2U9cGludGVyZXN0LmNvbSZ1dG1fbWVkaXVtPXJlZmVycmFs”]

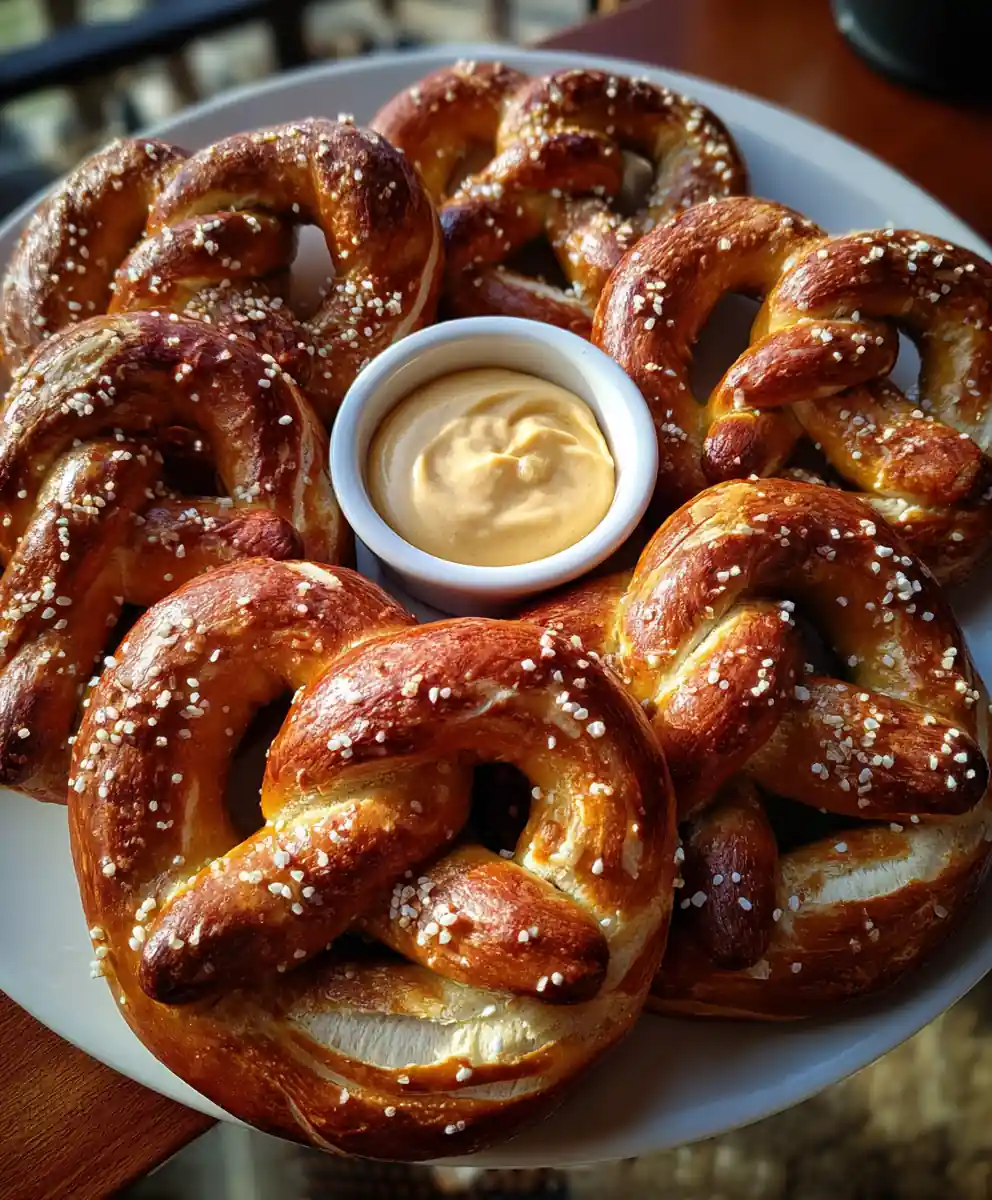
  • Homemade Bavarian Pretzels with Tangy Dijon Mustard Dip

    Homemade Bavarian Pretzels with Tangy Dijon Mustard Dip

    Master the art of traditional German baking with these irresistible homemade Bavarian Pretzels. This recipe guides you through creating perfectly chewy, deep golden-brown pretzels, complete with the essential baking soda bath for that iconic flavor and crust. Paired with a simple, yet utterly delicious tangy Dijon mustard dip, these pretzels are an impressive treat perfect for any gathering or a cozy snack.

    Ingredients

    • 4 cups (480g) all-purpose or bread flour
    • 2 ¼ teaspoons (1 packet) active dry yeast
    • 1 ½ cups (360ml) warm water, 105-115°F (40-46°C)
    • 1 tablespoon coarse salt, plus extra pretzel salt for topping
    • ½ cup (120g) baking soda
    • ¼ cup (56g) unsalted butter, melted
    • ½ cup (120g) Dijon or stone-ground mustard
    • 2 tablespoons (25g) light brown sugar, packed
    • 1 tablespoon (15ml) white vinegar

    Instructions

    1. Activate the Yeast: In a substantial mixing bowl, combine the warm water (ensuring it’s between 105-115°F or 40-46°C), a small pinch of brown sugar (reserved from the dip ingredients) to feed the yeast, and the active dry yeast. Gently stir, then let this mixture rest undisturbed for 5-10 minutes. Look for a visible layer of foam or bubbles on the surface; this confirms your yeast is active and potent.
    2. Combine Dry and Wet Ingredients: In a separate, larger bowl, thoroughly whisk together the all-purpose or bread flour and the 1 tablespoon of coarse salt, ensuring even distribution. Create a well in the center of the dry ingredients. Pour the activated yeast mixture and the melted unsalted butter into this well.
    3. Form and Knead the Dough: Begin mixing the ingredients with a sturdy spoon or spatula until a shaggy, cohesive dough starts to form. Transfer this dough onto a lightly floured countertop or a clean, sturdy surface. Knead the dough by hand with a push-and-fold motion for 8-10 minutes, or utilize a stand mixer fitted with a dough hook on medium-low speed for 6-8 minutes. The dough should transform into a smooth, pliable, and elastic ball that springs back when gently pressed.
    4. First Proofing: Lightly brush the inside of a clean, large bowl with oil. Place the kneaded dough inside, turning it once to ensure all sides are coated to prevent drying. Cover the bowl securely with plastic wrap or a clean, damp kitchen towel. Allow the dough to rise in a warm, draft-free environment for 60-90 minutes, or until its volume has clearly doubled, indicating proper fermentation.
    5. Shape the Pretzels: Gently deflate the risen dough by pressing it down. Transfer it to a clean surface and divide it into 8-10 equal portions, aiming for consistency in size for even baking. Take each portion and roll it between your palms and the countertop into a long, slender rope, approximately 20-24 inches (50-60 cm) in length, ensuring the ends are slightly tapered. To form the classic pretzel shape, create a U-shape, then cross the ends over each other once, twist them, and bring them back down to gently press onto the bottom curve of the U. Repeat for all pieces.
    6. Prepare the Lye Bath (Baking Soda): Select a wide, shallow pot or a Dutch oven (at least 8-quart capacity). Combine 8 cups of water with the ½ cup of baking soda. Bring this mixture to a vigorous rolling boil over high heat, ensuring all the baking soda has dissolved.
    7. Boil the Pretzels: Carefully, using a large slotted spoon or spider, immerse 1-2 shaped pretzels into the rapidly boiling baking soda solution at a time. Boil each pretzel for precisely 30 seconds per side. During this crucial step, the dough will puff slightly and begin to develop that distinct, slightly rubbery texture characteristic of pretzels, setting the stage for the deep brown crust.
    8. Bake to Golden Perfection: Promptly remove the boiled pretzels from the bath using the slotted spoon, allowing any excess water to drain off. Arrange them on a baking sheet lined with parchment paper, leaving some space between each. Immediately and generously sprinkle the tops with coarse pretzel salt. Transfer to a preheated oven at 400°F (200°C) and bake for 12-15 minutes, or until they achieve a deep, appetizing golden-brown hue and have a firm, shiny crust.
    9. Whip Up the Tangy Mustard Dip: While the pretzels are baking and cooling, prepare the essential accompaniment. In a small mixing bowl, vigorously whisk together the Dijon or stone-ground mustard, the packed light brown sugar, and the white vinegar until smooth and well combined. This simple, tangy dip is the perfect counterpoint to the savory, salty pretzels.

    Baker’s Notes

    • Yeast Activity is Key: Always ensure your yeast is active by performing the proofing step. If it doesn’t foam, your water might be too cold or hot, or the yeast is expired.
    • Flour Choice Matters: For the chewiest pretzels, opt for bread flour. All-purpose flour will still yield delicious results, but with a slightly softer texture.
    • Pretzel Salt: While coarse sea salt works, true pretzel salt adheres better and gives a more authentic appearance and intense salty crunch.
    • Don’t Over-Boil: Boiling for too long can lead to a tough pretzel. Stick to the 30 seconds per side for the ideal texture and crust development.

    Try These Variations

    • Cinnamon Sugar Pretzels: After boiling, instead of salt, brush pretzels with melted butter and sprinkle generously with a cinnamon-sugar mixture before baking.
    • Cheese-Stuffed Pretzels: Before shaping, flatten each dough portion, place a small cube of sharp cheddar or mozzarella in the center, and then seal the dough around it before rolling and shaping.
    • Everything Bagel Pretzels: After the baking soda bath, sprinkle generously with everything bagel seasoning for a savory twist.
    • Sweet Mustard Dip: Add a teaspoon of honey or maple syrup to the mustard dip for extra sweetness.

    Make Ahead / Freeze

    • Dough Ahead: The dough can be prepared up to the first rise, then covered tightly and refrigerated for up to 24 hours. Let it come to room temperature for about 30 minutes before shaping.
    • Baked Pretzels: Cooked and cooled pretzels can be stored in an airtight container at room temperature for 1-2 days. Reheat briefly in a 350°F (175°C) oven or toaster oven for best results.
    • Freezing Baked Pretzels: For longer storage, freeze cooled, baked pretzels in a single layer on a baking sheet until solid, then transfer to a freezer-safe bag for up to 1 month. Thaw at room temperature and reheat as desired.

    Prep Time: 30 minutes | Cook Time: 20 minutes | Rise Time: 60-90 minutes | Yields: 8-10 soft pretzels

    FAQs

    Can I use instant yeast instead of active dry yeast?
    Yes, you can. If using instant yeast, you can typically skip the activation step and mix it directly with the dry ingredients. However, ensuring it’s still active by proofing a small amount is always a good practice.
    What is the purpose of the baking soda bath?
    The baking soda bath is crucial! It gelatinizes the starch on the pretzel’s surface, contributing to the distinct chewy crust, dark brown color, and characteristic flavor that defines a true Bavarian pretzel.
    My dough isn’t rising; what went wrong?
    Several factors can inhibit yeast activity. Ensure your warm water is within the specified temperature range (105-115°F); water that’s too hot can kill the yeast, while water that’s too cold won’t activate it. Also, check the expiration date on your yeast.
    Can I make the pretzel dough ahead of time?
    Absolutely! After the first rise, you can punch down the dough, cover it tightly with plastic wrap, and refrigerate it for up to 24 hours. Let it sit at room temperature for about 30 minutes before shaping.
    What if I don’t have pretzel salt?
    While pretzel salt is ideal for its coarse texture and adherence, you can use other coarse salts like sea salt or kosher salt. They won’t stick quite as well but will still provide a delicious salty crunch.
    How do I prevent my pretzels from getting tough?
    Avoid over-kneading the dough, as this can develop too much gluten and result in a tough texture. Also, be mindful of the boiling time; precisely 30 seconds per side is key to a perfect balance of chewiness and tenderness.
    Can I double this recipe?
    Yes, this recipe can be doubled. You might need a larger bowl for mixing and rising, and potentially two baking sheets to accommodate all the pretzels during baking.
    How should I store leftover pretzels and the dip?
    Leftover baked pretzels are best stored in an airtight container at room temperature for 1-2 days. The mustard dip should be kept refrigerated in an airtight container and is best consumed within 3-5 days.

    [redirect_script url=”aHR0cHM6Ly93d3cuY29va2luZ3dpdGhsb3JhLmNvbS9hdXRoZW50aWMtYmF2YXJpYW4tcHJldHplbC1yZWNpcGUtd2l0aC1tdXN0YXJkLWRpcC8/dXRtX3NvdXJjZT1waW50ZXJlc3QuY29tJnV0bV9tZWRpdW09cmVmZXJyYWw=”]

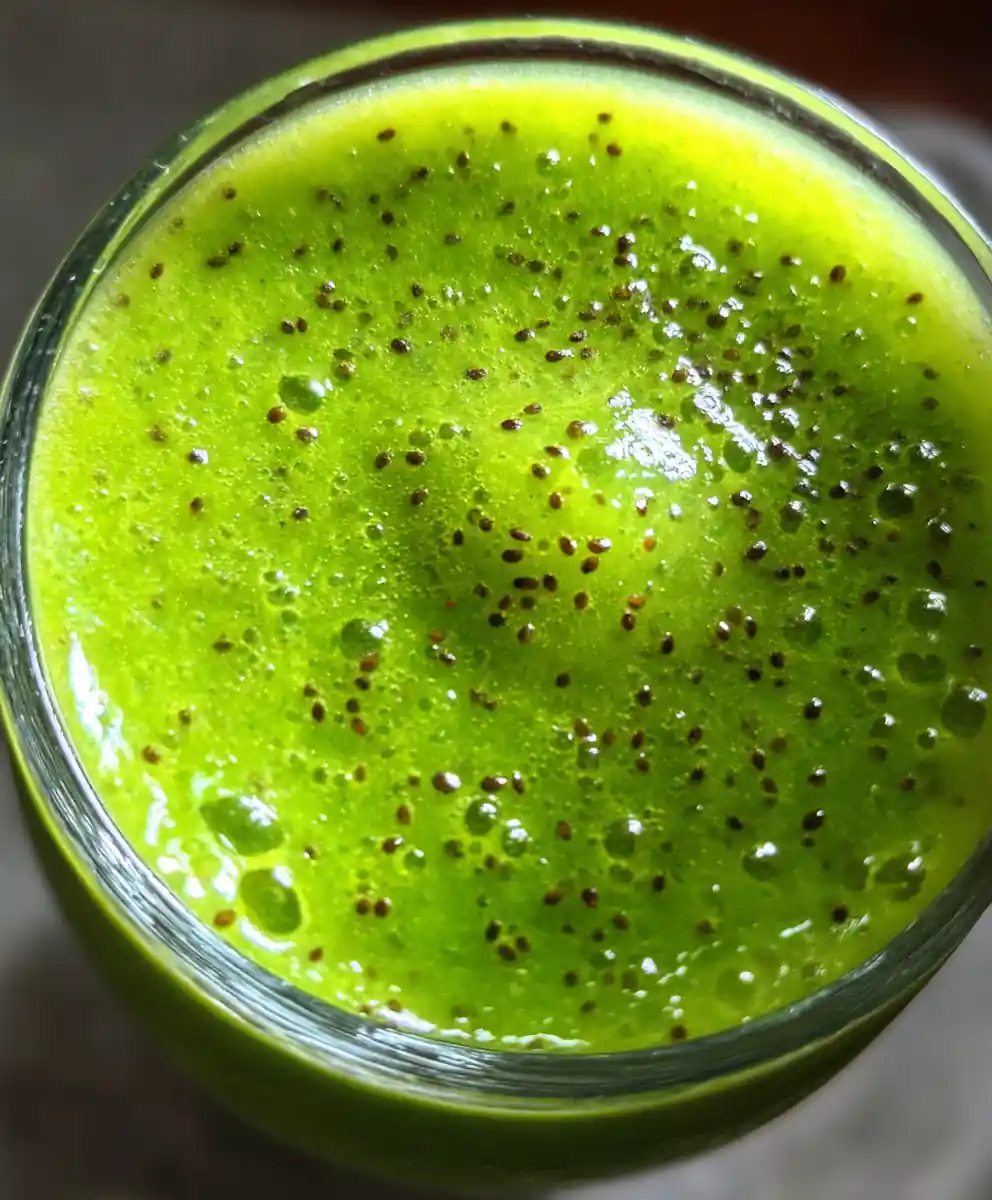
  • Vibrant Spinach & Kiwi Green Smoothie: A Refreshing Power Boost

    Vibrant Spinach & Kiwi Green Smoothie: A Refreshing Power Boost

    Kickstart your day with this vibrant Glowing Green Smoothie, packed with nutrient-rich spinach and tangy kiwi. This quick and easy recipe offers a delicious way to boost your energy and support your well-being.

    Ingredients

    • fresh spinach, firmly packed (1 to 2 cups / 30-60g)
    • ripe kiwi, peeled and halved (1 to 2 large)
    • banana, ripe or frozen and sliced (1 medium)
    • liquid of choice (e.g., water, almond milk, coconut water) (1 to 1½ cups / 240-360ml)
    • Optional add-ins: such as chia seeds or flax seeds (1 tablespoon), protein powder (1 scoop), or fresh ginger, peeled and grated (½ inch piece)

    Instructions

    1. Prepare Ingredients: Begin by carefully peeling the ripe kiwi and the banana. For the spinach, rinse it thoroughly under cool running water to remove any dirt or grit, then gently shake off excess moisture.
    2. Load the Blender: Pour your preferred liquid into the blender container first—this helps the blades effectively process the ingredients. Next, add the washed spinach, peeled kiwi halves, sliced banana, and any optional enhancements like seeds or ginger.
    3. Initiate Blending: Secure the lid on your blender. Start blending on a low speed to incorporate ingredients, then steadily increase to a high setting. Continue processing for 1 to 2 minutes until the smoothie is completely smooth, lump-free, and has a uniform creamy texture.
    4. Customize Consistency & Flavor: Evaluate the smoothie’s thickness. If it’s too dense, add additional liquid, a tablespoon at a time, blending briefly after each addition until your desired pourable consistency is achieved. For enhanced sweetness, you can incorporate a pitted Medjool date or a touch of honey and blend again until smooth.

    Cook’s Notes

    • For a colder smoothie, use a frozen banana or add a few ice cubes.
    • Don’t overfill your blender; process in batches if necessary.
    • Blending liquid first creates a vortex that pulls solids down, ensuring a smoother result.
    • Taste and adjust sweetness or tartness; a squeeze of lime can brighten flavors.

    Keep & Reheat

    • Enjoy your green smoothie immediately for optimal freshness and nutrient content.
    • If you have leftovers, store them in an airtight container in the refrigerator for up to 24 hours. Some separation may occur, just shake or re-blend briefly before serving.
    • Freezing is not recommended for this type of smoothie as the texture can become watery upon thawing.

    Know Your Ingredients

    Spinach is a powerhouse of vitamins K, A, and C, and a great source of iron, promoting bone health and immunity. Kiwi is rich in vitamin C and dietary fiber, aiding digestion and skin health. Bananas provide potassium and natural sweetness, making them an excellent base for smoothies, especially when frozen for a creamier texture.

    Prep time: 8 minutes | Total time: 10 minutes | Yield: 1 generous serving

    FAQs

    Can I make this smoothie ahead of time?
    It’s best enjoyed immediately for optimal freshness, but you can store it in an airtight container in the refrigerator for up to 24 hours. Stir or re-blend briefly before serving as some separation may occur.
    What liquids work best for this recipe?
    Water, almond milk, coconut water, or even orange juice are all great options. Choose based on your desired flavor and calorie content.
    Can I substitute spinach with other greens?
    Yes, you can swap spinach for other mild greens like kale (remove tough stems), romaine lettuce, or even a mix of greens. Adjust the quantity to your taste.
    How can I make this smoothie sweeter or tarter?
    For more sweetness, blend in a pitted Medjool date, a drizzle of honey or maple syrup, or a few drops of stevia. For a tarter kick, add a squeeze of fresh lemon or lime juice.
    What if my smoothie is too thick or too thin?
    If too thick, add more liquid one tablespoon at a time until it reaches your desired consistency. If too thin, add a few more pieces of frozen banana or a handful of ice cubes and blend again.
    Can I use fresh or frozen banana?
    Both work! A ripe fresh banana adds sweetness, while a frozen banana will make your smoothie colder and creamier without needing ice.
    What are some good optional add-ins for this smoothie?
    Beyond chia/flax seeds, protein powder, and ginger, consider a scoop of nut butter for healthy fats, spirulina for extra nutrients, or mint leaves for a refreshing twist.
    What kind of blender do I need?
    A high-speed blender is ideal for achieving a super smooth consistency, especially with fibrous greens. However, a standard blender will also work; just blend for a bit longer.

    [redirect_script url=”aHR0cHM6Ly93d3cuY29va2luZ3dpdGhsb3JhLmNvbS9nbG93aW5nLWdyZWVuLXNtb290aGllLXJlY2lwZS13aXRoLXNwaW5hY2gtYW5kLWtpd2k/dXRtX3NvdXJjZT1waW50ZXJlc3QuY29tJnV0bV9tZWRpdW09cmVmZXJyYWw=”]