Category: Desserts & Baking

  • Classic Pecan Tassies: Irresistible Mini Pecan Pies

    Classic Pecan Tassies: Irresistible Mini Pecan Pies

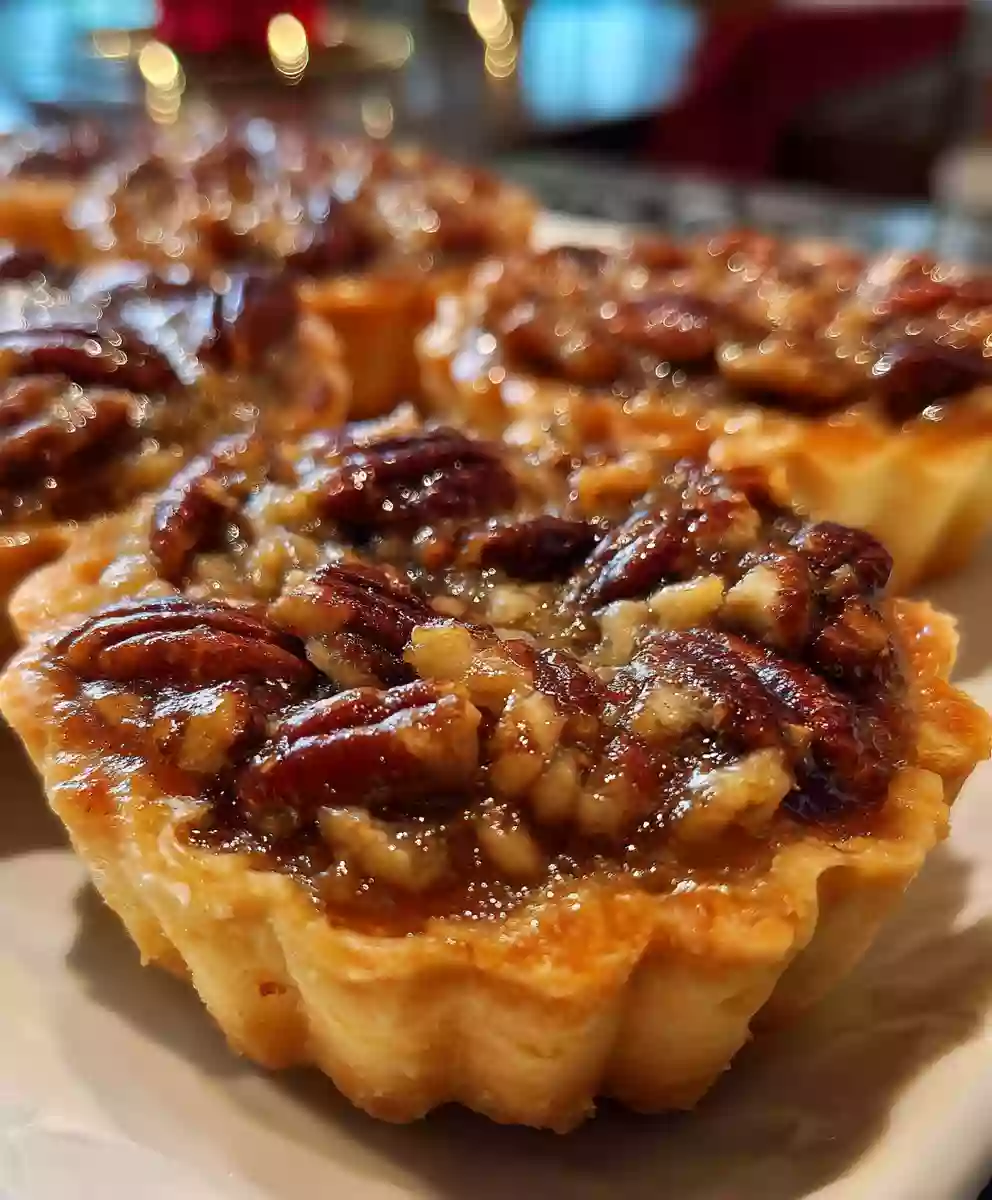
    Experience the joy of baking these charming Classic Pecan Tassies, miniature pecan pies that are perfect for any occasion. Each bite-sized treat features a tender, buttery cream cheese crust cradling a rich, gooey pecan filling, promising a delightful blend of textures and flavors. Simple to prepare, these elegant tassies are an unforgettable sweet indulgence that will impress everyone.

    Ingredients

    • 1 cup (226g) cold unsalted butter, cut into small cubes
    • 8 oz (226g) softened cream cheese
    • 2 cups (240g) all-purpose flour
    • 1 ½ cups (300g) packed light brown sugar
    • ¾ cup (180ml) light corn syrup or pure maple syrup
    • 2 large eggs, at room temperature
    • 1 teaspoon pure vanilla extract
    • 1 ½ cups (170g) pecans, halved or roughly chopped

    Instructions

    1. Prepare the Cream Cheese Crust: In the bowl of a food processor, combine the cold, cubed unsalted butter, softened cream cheese, and all-purpose flour. Pulse briefly, then process until a cohesive, soft dough forms, typically within 15-20 seconds. Be cautious not to overmix, which can lead to a tough crust. Gather the dough into a disc, wrap it tightly in plastic, and chill in the refrigerator for at least 25 minutes to allow it to firm up, making it easier to handle.
    2. Shape the Tassie Shells: Once chilled, pinch off small portions of dough, approximately 1 tablespoon each. Press each dough ball evenly into the cups of a mini muffin tin. Your thumb works well for this, creating a thin, uniform shell that extends up the sides. There’s no need to pre-bake these crusts, saving you a step! This recipe yields about 24 mini pies.
    3. Craft the Gooey Pecan Filling: In a medium mixing bowl, whisk together the packed light brown sugar, corn syrup (or maple syrup), room temperature large eggs, and pure vanilla extract until the mixture is smooth and well combined. This liquid gold forms the base of your rich, caramel-like filling. Gently fold in the pecans until every piece is thoroughly coated.
    4. Fill the Crusts: Carefully spoon the pecan filling into each unbaked crust. Fill each cup about two-thirds full to leave room for the filling to bubble and expand slightly during baking without overflowing.
    5. Bake to Golden Perfection: Preheat your oven to 350°F (175°C). Bake the mini pecan pies for 25-30 minutes, or until the crusts turn a lovely golden brown and the filling appears set and slightly puffed. To check for doneness, a toothpick inserted near the center of a filling should come out mostly clean with just a few moist crumbs.
    6. Cool and Enjoy: Allow the baked pecan tassies to cool in their mini muffin tins for 10-15 minutes. This crucial cooling period helps the filling set properly and makes them significantly easier to remove without breaking. After the initial cooling, transfer them to a wire rack to cool completely before serving for the best texture and flavor.

    Pro Tips

    • Ensure your butter for the crust is very cold, and your cream cheese is softened but not warm, for the best dough consistency.
    • When shaping the crust, aim for an even thickness to ensure uniform baking. Too thick on the bottom can leave it undercooked.
    • Don’t overmix the filling once the pecans are added; a gentle fold ensures they are evenly distributed without bruising them.
    • For extra flavor, you can lightly toast the pecans before adding them to the filling, enhancing their nutty aroma.
    • If using maple syrup, choose a good quality, dark amber variety for a richer flavor profile.

    Storage & Make-Ahead

    • Cooled pecan tassies can be stored in an airtight container at room temperature for up to 3 days, or in the refrigerator for up to 5 days.
    • For longer storage, freeze cooled tassies in a single layer on a baking sheet until solid, then transfer to a freezer-safe bag or container for up to 3 months. Thaw at room temperature or gently reheat in a low oven.
    • The dough can be made ahead and stored in the refrigerator for up to 2 days, or frozen for up to 1 month. Thaw frozen dough in the refrigerator before using.

    Essential Equipment

    • Food processor or pastry blender for the crust
    • Mini muffin tin (24-cup)
    • Medium mixing bowls
    • Whisk
    • Measuring cups and spoons
    • Wire cooling rack

    Prep Time: 1 hour | Cook Time: 27 minutes | Yield: 24 mini pies

    FAQs

    Can I use a different type of nut instead of pecans?
    Yes, you can substitute walnuts or even chopped almonds for pecans, though the flavor profile will differ slightly. Ensure they are roughly chopped to the same size as pecans.
    My crust is tough; what did I do wrong?
    A tough crust usually results from overmixing the dough. Process just until the ingredients are combined and a soft dough forms. Overworking develops the gluten, making the crust less tender.
    Can I make a full-sized pecan pie with this recipe?
    This recipe is specifically formulated for mini tassies, including the crust-to-filling ratio and baking time. Adapting it for a full-sized pie would require significant adjustments to crust thickness, filling volume, and bake time.
    How do I know when the filling is perfectly set?
    The filling is set when it no longer jiggles excessively in the center. A toothpick inserted near the middle should come out mostly clean, indicating it’s cooked through without being dry.
    What if I don’t have corn syrup?
    Maple syrup is listed as a direct substitute in the recipe, offering a slightly different but equally delicious flavor. You can also use golden syrup or a homemade simple syrup (equal parts sugar and water boiled down) in a pinch.
    Can these be made ahead for a party?
    Absolutely! Pecan tassies are excellent make-ahead treats. They can be baked and stored at room temperature for a couple of days, or frozen for up to three months. This makes them perfect for holiday gatherings or entertaining.
    Why did my filling bubble over in the oven?
    This usually happens if the muffin cups are overfilled. Ensure you’re only filling each unbaked crust about two-thirds full, allowing adequate space for the filling to expand during baking.

    [redirect_script url=”aHR0cHM6Ly9lYXN5ZGFzaHJlY2lwZXMuY29tL3BlY2FuLXRhc3NpZS1yZWNpcGUtbWluaS1wZWNhbi1waWVzLz91dG1fc291cmNlPXBpbnRlcmVzdC5jb20mdXRtX21lZGl1bT1yZWZlcnJhbA==”]

  • Classic Pineapple Upside Down Cake with Duncan Hines Mix

    Classic Pineapple Upside Down Cake with Duncan Hines Mix

    Discover the delightful simplicity of crafting a stunning Classic Pineapple Upside Down Cake using a convenient Duncan Hines mix. This recipe transforms a kitchen staple into a show-stopping dessert, featuring a glistening caramelized pineapple and cherry topping over a perfectly moist cake base. It’s a nostalgic treat that’s surprisingly easy to achieve, perfect for any occasion.

    Ingredients

    • 1 box Duncan Hines Yellow or Butter Golden Cake Mix
    • 1 can (20 oz) pineapple slices, in juice or light syrup, drained well
    • ½ cup (100g) light brown sugar, packed
    • ¼ cup (56g) unsalted butter, melted
    • Maraschino cherries, stemmed and drained, for garnish
    • Eggs, Water, and Oil, as directed on cake mix box

    Instructions

    1. Preheat and Prep the Pan: Begin by preheating your oven to a precise 350°F (175°C). While the oven heats, place the ¼ cup (56g) unsalted butter directly into a 9-inch round cake pan or a sturdy cast iron skillet. Place the pan in the preheating oven for about 8-10 minutes, just until the butter is completely melted and bubbling slightly. This step also warms the pan, ensuring a smooth caramel.
    2. Form the Caramelized Base: Carefully retrieve the hot pan from the oven using oven mitts. Immediately sprinkle the ½ cup (100g) packed light brown sugar evenly over the melted butter. Use a spatula or gently swirl the pan to combine the butter and sugar, creating a glistening, sticky, sweet caramel layer that will form the top of your cake.
    3. Arrange the Fruit Artfully: Take your well-drained pineapple slices and arrange them in a decorative pattern over the caramel base. For a classic look, place whole slices side-by-side. Nest a vibrant maraschino cherry into the center of each pineapple ring, and then scatter a few additional cherries in the gaps between the slices to add bursts of color and extra sweetness.
    4. Prepare the Cake Batter: In a large mixing bowl, combine the Duncan Hines cake mix with the specified amounts of eggs, water, and oil as directed on the cake mix box packaging. Using an electric mixer on medium speed, beat the ingredients for 2-3 minutes until the batter is smooth and lump-free. Be mindful not to overmix, as this can develop the gluten and result in a tougher cake.
    5. Pour Batter and Bake: Gently and carefully pour the prepared cake batter over the pineapple and cherry layer in the pan. Distribute it evenly using an offset spatula, taking care not to disturb the beautifully arranged fruit beneath. Transfer the pan to the preheated oven and bake for 36-44 minutes. The cake is done when a wooden toothpick inserted into the center comes out clean, the top is golden brown, and the edges begin to pull away from the sides of the pan.
    6. Cool and Invert with Care: Allow the baked cake to cool in its pan on a wire rack for exactly 8 minutes. This crucial cooling time allows the hot caramel to firm up slightly, preventing it from running everywhere. After 8 minutes, run a thin knife around the cake edges to loosen. Place a large serving platter or plate upside down over the cake pan, then, holding both firmly together, swiftly and carefully flip them over. Gently lift the cake pan to unveil your stunning Pineapple Upside Down Cake. If any fruit clings to the pan, carefully re-position it on the cake.

    Recipe At-A-Glance

    This recipe provides a fantastic shortcut to a beloved classic, leveraging the convenience of a cake mix without sacrificing flavor or presentation. The magic happens with the rich, buttery brown sugar caramel that perfectly infuses the pineapple, creating a sticky-sweet topping that becomes irresistible once inverted. It’s a visually striking dessert that’s simple enough for beginners but impressive enough for any gathering.

    Try These Variations

    • Tropical Twist: Swap half the pineapple with thinly sliced mango or star fruit for a more exotic flavor.
    • Spiced Caramel: Add ¼ teaspoon of ground cinnamon or a pinch of nutmeg to the brown sugar mixture for a warm, spiced note.
    • Boozy Boost: Drizzle a tablespoon of dark rum or brandy over the pineapple slices before pouring the batter for an adult-friendly version.
    • Nutty Crunch: Sprinkle finely chopped pecans or walnuts over the caramel layer before arranging the pineapple for added texture.

    Make Ahead / Freeze

    • Make Ahead: While best served warm, this cake is still delicious at room temperature and can be prepared a few hours in advance. Cover loosely to prevent drying.
    • Storage: Store leftovers, covered, at room temperature for up to 2 days, or in the refrigerator for up to 4 days. Bring to room temperature before serving for best flavor.
    • Freezing: Freezing is not recommended for upside-down cakes as the fruit can become watery upon thawing.

    Pan & Tools

    A 9-inch round cake pan is ideal for this recipe, but a cast iron skillet of the same size works wonderfully and creates a beautifully crisp caramel edge. Ensure your pan has good non-stick qualities or is well-seasoned if using cast iron. A sturdy wire rack for cooling is also essential for proper caramel setting and air circulation.

    Prep time: 12 minutes | Cook time: 38 minutes | Yield: 8 to 10 slices

    FAQs

    Can I use fresh pineapple instead of canned?
    While fresh pineapple can be used, it contains enzymes that can sometimes prevent the cake from setting around the fruit. If you opt for fresh, ensure it’s ripe and thinly sliced, and consider sautéing it briefly with a little butter and sugar first to mellow the enzymes.
    What if my cake doesn’t release cleanly from the pan?
    The key is proper cooling time and loosening the edges. If it sticks, gently tap the bottom of the pan while still inverted. If a piece of fruit stays behind, carefully re-position it on the cake with a spatula.
    Can I make this cake ahead of time?
    This cake is best served warm from the oven, allowing the caramel to be perfectly gooey. However, it can be made a few hours in advance and stored at room temperature, covered loosely.
    How do I store leftover Pineapple Upside Down Cake?
    Store any leftovers covered at room temperature for up to 2 days, or in the refrigerator for up to 4 days. Allow refrigerated cake to come to room temperature before serving for optimal flavor and texture.
    What other fruits can I use for an upside-down cake?
    Beyond pineapple, sliced apples, pears, peaches, plums, or even berries can make delicious upside-down cakes. Adjust the sweetness of the caramel base depending on the fruit’s tartness.
    Can I use a different size pan?
    You can, but you may need to adjust baking time. A smaller pan might require longer baking, while a larger pan will result in a thinner cake that bakes faster. Ensure to check for doneness with a toothpick.
    How do I know when the cake is perfectly baked?
    Look for a golden-brown top and edges that have slightly pulled away from the pan. The most reliable test is inserting a wooden toothpick into the center; it should come out clean with no wet batter attached.

    [redirect_script url=”aHR0cHM6Ly9lYXN5ZGFzaHJlY2lwZXMuY29tL2R1bmNhbi1oaW5lcy1waW5lYXBwbGUtdXBzaWRlLWRvd24tY2FrZS1yZWNpcGUtY2xhc3NpYy8/dXRtX3NvdXJjZT1waW50ZXJlc3QuY29tJnV0bV9tZWRpdW09cmVmZXJyYWw=”]

  • Creamy Homemade Mango Lassi: A Refreshing Indian Yogurt Smoothie

    Creamy Homemade Mango Lassi: A Refreshing Indian Yogurt Smoothie

    Transport yourself to a tropical paradise with this incredibly easy and luscious Creamy Homemade Mango Lassi. This vibrant Indian yogurt smoothie, made with ripe mangoes and cooling yogurt, is perfect for a quick breakfast, a light snack, or a delightful complement to spicy meals.

    Ingredients

    • 2 cups (about 300g) ripe mango, peeled and chopped (fresh or frozen for convenience)
    • 1 cup (240ml) plain whole milk yogurt, chilled
    • 1/2 cup (120ml) milk (dairy or non-dairy, chilled)
    • 2-4 tablespoons (30-60ml) preferred sweetener (granulated sugar, honey, or maple syrup), adjusted to your taste
    • About 1/2 cup ice cubes (optional, for extra chill and frothiness)

    Instructions

    1. Prepare your mangoes: If using fresh mangoes, carefully peel them using a vegetable peeler or paring knife, then chop the sweet, golden flesh into roughly 1-inch chunks. If opting for frozen mango, no peeling or chopping is necessary, simply measure directly from the bag.
    2. Combine all ingredients in blender: Carefully add the prepared mango chunks, the smooth plain whole milk yogurt, your choice of milk, the desired amount of sweetener, and the optional ice cubes into the container of a sturdy blender. Ensure there’s enough room for blending.
    3. Blend until perfectly smooth and creamy: Secure the blender lid tightly and begin processing on a low speed, gradually increasing to high. Continue blending for 60-90 seconds, or until the mixture is utterly velvety, completely free of any mango lumps, and appears uniformly smooth. Pause and scrape down sides if needed to ensure thorough blending.
    4. Serve immediately for optimal enjoyment: Once blended to perfection, promptly pour the vibrant Mango Lassi into chilled tall glasses. Garnish with a sprig of mint or a sprinkle of cardamom if desired, then savor this refreshing taste of sunshine without delay.

    Baker’s Notes

    For the best flavor, use truly ripe mangoes – they should be soft to the touch and smell fragrant at the stem. If using frozen mango, let it thaw slightly for easier blending and to prevent over-thickening.

    • Adjust sweetness gradually: Start with 2 tablespoons of sweetener and taste before adding more, as mango sweetness varies.
    • Chill your ingredients: Using cold yogurt and milk enhances the lassi’s refreshing quality, especially if you omit the ice.
    • For a thicker lassi: Use less milk or add an extra tablespoon of yogurt. For a thinner consistency, simply add a splash more milk.

    Try These Variations

    Customize your mango lassi with these delicious twists:

    • Spice it up: Add a pinch of ground cardamom or a tiny piece of fresh ginger to the blender for an aromatic kick.
    • Tropical boost: Blend in half a ripe banana or a few pineapple chunks for added fruitiness and creaminess.
    • Protein punch: Include a scoop of your favorite vanilla or unflavored protein powder for a more substantial drink.
    • Vegan-friendly: Ensure you use a plant-based yogurt (like coconut or almond) and non-dairy milk.

    Make Ahead / Freeze

    Mango Lassi is best enjoyed fresh, but you can prepare it a little in advance.

    • Make-ahead: Prepare the lassi up to 2-3 hours beforehand and store it in an airtight container in the refrigerator. Stir well before serving as separation might occur.
    • Freezing: While not ideal for drinking, leftover lassi can be frozen into popsicles for a refreshing treat.

    Prep time: 8 minutes | Blend time: 2 minutes | Total time: 10 minutes | Yields: 2 servings

    FAQs

    Can I use frozen mango for this recipe?
    Yes, absolutely! Frozen mango chunks work wonderfully and often result in a thicker, colder lassi. No need to thaw completely before blending.
    What kind of yogurt is best for mango lassi?
    Plain whole milk yogurt or Greek yogurt is ideal for its creamy texture and tangy balance. If using Greek yogurt, you might need a splash more milk to achieve the desired consistency.
    Can I make mango lassi without added sugar?
    Certainly! If your mangoes are very ripe and sweet, you might not need any extra sweetener. Taste the mixture before adding any, or use dates for a natural, unrefined sweetness.
    How can I make my lassi thicker or thinner?
    For a thicker lassi, reduce the amount of milk or add a bit more yogurt or mango. To thin it out, simply add an extra splash of milk until it reaches your preferred consistency.
    What are good alternatives if I don’t have fresh mango?
    Besides frozen mango, you can use canned mango pulp, but be sure to choose unsweetened or adjust the added sweetener accordingly as canned pulp is often very sweet.
    How long does mango lassi last in the refrigerator?
    Mango lassi is best consumed fresh. While it can be stored in an airtight container in the refrigerator for up to 24 hours, the flavors and consistency are optimal within the first few hours after blending.
    Can I make this recipe vegan?
    Yes, easily! Simply substitute the dairy milk and yogurt with your favorite plant-based alternatives, such as almond milk, oat milk, or coconut milk yogurt.

    [redirect_script url=”aHR0cHM6Ly9lYXN5ZGFzaHJlY2lwZXMuY29tL21hbmdvLWxhc3NpLXJlY2lwZS1jcmVhbXkteW9ndXJ0LWRyaW5rLz91dG1fc291cmNlPXBpbnRlcmVzdC5jb20mdXRtX21lZGl1bT1yZWZlcnJhbA==”]

  • Classic Marble Cake: Swirled Chocolate & Vanilla Perfection

    Classic Marble Cake: Swirled Chocolate & Vanilla Perfection

    Indulge in the timeless charm of a homemade marble cake, where ribbons of rich chocolate batter elegantly intertwine with light, fluffy vanilla. This recipe guides you through creating a visually stunning and delightfully moist cake that’s perfect for any occasion, offering a beautiful balance of flavors in every bite.

    Ingredients

    • 2 ½ cups all-purpose flour, sifted
    • 1 ½ cups granulated sugar
    • 3 large eggs, room temperature
    • ½ cup unsalted butter, softened
    • 1 cup whole milk, room temperature
    • 2 teaspoons pure vanilla extract
    • ¼ cup unsweetened cocoa powder, sifted
    • 2 teaspoons baking powder
    • ½ teaspoon fine sea salt

    Instructions

    1. Preheat your oven to 350°F (175°C) and prepare your baking pan. Thoroughly grease and lightly flour a 9×13 inch baking pan, or two 8-inch round cake pans. This creates a non-stick surface, ensuring your cake releases cleanly after baking.
    2. In a large mixing bowl, using an electric mixer, cream together the softened unsalted butter and granulated sugar on medium-high speed for 2-3 minutes until the mixture appears light, pale, and fluffy. This process incorporates essential air, contributing to a tender crumb.
    3. Beat in the large eggs one at a time, ensuring each egg is fully incorporated before adding the next. Scrape down the sides of the bowl as needed. Stir in the pure vanilla extract until just combined, infusing the batter with its aromatic flavor.
    4. In a separate medium bowl, whisk together the sifted all-purpose flour, baking powder, and fine sea salt until thoroughly combined. This step prevents lumps and ensures even distribution of leavening agents.
    5. Gradually add the dry ingredients to the wet mixture in three additions, alternating with the room temperature whole milk in two additions. Begin and end with the dry ingredients. Mix on low speed until just combined; stop mixing as soon as no dry streaks remain to avoid overworking the gluten, which can result in a tough cake.
    6. Carefully divide the prepared cake batter into two equal portions. Into one bowl, gently fold in the sifted unsweetened cocoa powder until no white streaks of batter are visible. Mix just enough to combine, creating a smooth chocolate batter.
    7. Dollop alternating spoonfuls of the vanilla and chocolate batters into your prepared pan. Once all the batter is in, take a knife or a skewer and gently swirl through the batters 3-4 times in a zigzag or figure-eight pattern. Be careful not to overmix, as the goal is distinct marbled patterns, not a uniform color.
    8. Bake the cake in the preheated oven for 30-35 minutes for a 9×13 inch pan, or 25-30 minutes for two 8-inch round pans. The cake is done when a wooden skewer or toothpick inserted into the center comes out clean or with moist crumbs attached. The top should be golden and spring back lightly when touched.
    9. Allow the baked marble cake to cool in its pan on a wire rack for 10-15 minutes. This allows the cake to set and prevents it from tearing. After this initial cooling, carefully invert the cake onto the wire rack to cool completely before frosting, glazing, or slicing.

    Chef’s Insight

    Achieving a truly remarkable marble cake hinges on two key techniques: perfectly creaming your butter and sugar, and exercising a light touch when swirling the batters. Overmixing at any stage can lead to a dense, tough cake, so embrace the ‘just combined’ principle. For a deeper chocolate hue and flavor, consider using a dark cocoa powder. Room temperature ingredients are also non-negotiable for a smooth, emulsified batter.

    Cook’s Notes

    • Ensure all dairy and eggs are at room temperature; this helps them emulsify better with the butter, creating a smoother, more uniform batter.
    • Measure your flour by weight (grams) if possible for the most accurate results, or spoon it into the measuring cup and level off, rather than scooping directly from the bag.
    • Don’t be tempted to overswirl the batters; a few gentle passes are all you need to create beautiful, distinct marble patterns without muddling the colors.
    • If using round pans, adjust baking time and keep an eye on doneness, as thinner cakes cook faster.

    Customize It

    • Coffee Enhancement: Add ½ teaspoon of instant espresso powder to the cocoa batter to deepen the chocolate flavor without making it taste like coffee.
    • Citrus Swirl: Substitute lemon or orange zest into the vanilla batter for a bright, refreshing contrast.
    • Nutty Addition: Fold ½ cup of finely chopped toasted pecans or walnuts into the vanilla batter for added texture and flavor.
    • Glaze Variation: Instead of frosting, drizzle a simple vanilla or chocolate glaze over the cooled cake for a lighter finish.

    Prep Time: 18 minutes | Cook Time: 38 minutes | Yield: 12 servings

    FAQs

    Why do my ingredients need to be at room temperature?
    Room temperature butter, eggs, and milk emulsify more effectively, creating a smoother, more uniform batter. This results in a lighter, finer-textured cake. Cold ingredients can cause the batter to curdle and prevent proper air incorporation.
    How do I prevent my marble cake from becoming dense or tough?
    The key is to avoid overmixing at every stage. Once you add the dry ingredients, mix only until just combined and no dry streaks remain. Overmixing develops gluten, which leads to a dense, chewy texture.
    What’s the best way to create distinct chocolate and vanilla swirls?
    After dolloping alternating spoonfuls of batter, use a knife or skewer to gently swirl through the batters 3-4 times. Resist the urge to overmix, as too much swirling will blend the colors together rather than creating defined marble patterns.
    Can I make this marble cake gluten-free?
    Yes, you can substitute the all-purpose flour with a 1:1 gluten-free baking blend. Ensure your blend contains xanthan gum or add ½ teaspoon per cup of flour for best results.
    How should I store leftover marble cake?
    Store leftover marble cake tightly covered at room temperature for up to 3 days, or in the refrigerator for up to 5 days. Ensure it is well-sealed to prevent it from drying out.
    Can I freeze marble cake?
    Yes, marble cake freezes beautifully. Wrap cooled cake slices or the whole cake tightly in plastic wrap, then in aluminum foil. It can be frozen for up to 3 months. Thaw overnight in the refrigerator before serving.
    My cake browned too quickly on top, what happened?
    Oven temperatures can vary. If you notice your cake browning too fast, loosely tent it with aluminum foil for the remainder of the baking time. Ensure your oven thermometer is accurate.
    What can I use if I don’t have a 9×13 inch pan?
    You can use two 8-inch round cake pans, which will result in two thinner layers. Adjust the baking time accordingly; they will typically bake faster, around 25-30 minutes.

    [redirect_script url=”aHR0cHM6Ly9lYXN5ZGFzaHJlY2lwZXMuY29tL21hcmJsZS1jYWtlLXJlY2lwZS13aXRoLWNob2NvbGF0ZS1zd2lybHMvP3V0bV9zb3VyY2U9cGludGVyZXN0LmNvbSZ1dG1fbWVkaXVtPXJlZmVycmFs”]