Author: Sarah Johnson

  • Perfect Sizzling Fajita Vegetables: Bell Peppers & Onion Medley

    Perfect Sizzling Fajita Vegetables: Bell Peppers & Onion Medley

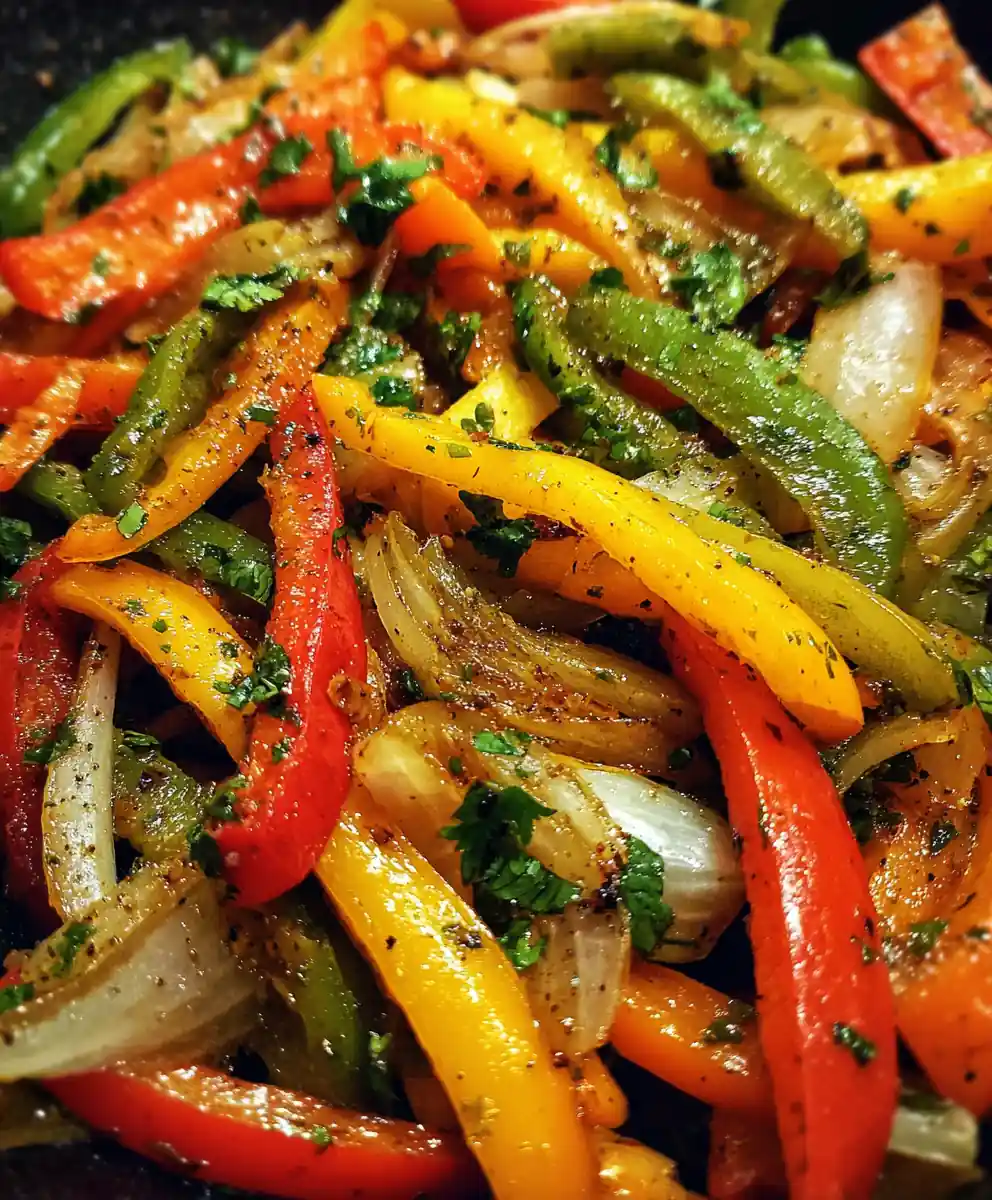
    Transform simple bell peppers and onions into a vibrant, flavorful dish with this easy recipe for sizzling fajita vegetables. Expertly seasoned and cooked to tender-crisp perfection with just the right amount of char, these veggies are an essential component for any fajita night or a versatile addition to countless meals.

    Ingredients

    • 3-4 large Bell Peppers (about 600-800g total), mixed colors (red, yellow, orange, green), deseeded and sliced into even 1/4-inch strips
    • 1 large Yellow or Red Onion (about 200g), peeled and sliced into thin half-moon strips
    • 2 tablespoons Olive Oil (or high-heat avocado oil), divided
    • 2 tablespoons Fajita Seasoning, your favorite blend (homemade or store-bought)
    • 3 cloves fresh Garlic, finely minced
    • 1 fresh Lime, halved for juicing
    • ¼ cup fresh Cilantro (optional), roughly chopped

    Instructions

    1. Prepare Your Produce: Begin by thoroughly washing your bell peppers. Carefully deseed each pepper, then slice them vertically into uniform 1/4-inch strips. Next, peel and slice the large onion into equally thin half-moon strips. Uniformity ensures even cooking and perfect texture.
    2. Heat Your Skillet: Place your heavy-bottomed skillet (a cast iron pan is ideal for achieving a great char) over medium-high heat. Add one tablespoon of the olive oil and allow it to heat until it shimmers and just begins to smoke, indicating it’s ready for searing.
    3. Sauté the Onions: Carefully add the sliced onion strips to the hot skillet. Cook them for 2-3 minutes, stirring occasionally, until they begin to soften and become translucent, releasing their aromatic sweetness. Avoid overcrowding the pan.
    4. Introduce Peppers & Seasoning: Now, add the prepared bell pepper strips to the skillet. Sprinkle the fajita seasoning generously over the vegetables. Stir everything thoroughly to ensure every piece is evenly coated with the vibrant spice blend. Continue to cook for 5-7 minutes, stirring periodically, until the peppers are tender-crisp with visible char marks, but still retain a slight bite.
    5. Finishing Touches: During the final minute of cooking, stir in the finely minced garlic. This brief cook time prevents the garlic from burning and turning bitter. Remove the pan from the heat, then immediately squeeze the fresh lime juice over the sizzling vegetables. If desired, scatter the roughly chopped cilantro over the top for a burst of freshness. Serve your delicious fajita vegetables hot!

    Cook’s Notes

    Achieving restaurant-quality fajita vegetables hinges on high heat and proper technique. Always ensure your skillet is smoking hot before adding any vegetables to promote searing and charring, not steaming. Cut your vegetables to a consistent size so they cook evenly, and avoid overcrowding the pan, which can drop the temperature and lead to soggy results. Don’t be afraid to let the vegetables get some good color; that char adds incredible flavor!

    How To Serve

    • Classic Fajitas: Serve wrapped in warm tortillas with your favorite protein, salsa, guacamole, and sour cream.
    • Burrito Bowls: Create vibrant bowls with rice, beans, corn, and a generous portion of these sizzling vegetables.
    • Side Dish: A fantastic, healthy side for grilled chicken, steak, or fish.
    • Salad Topper: Add cooled fajita veggies to a fresh salad for extra flavor and texture.
    • Breakfast Scramble: Mix leftovers into scrambled eggs or a breakfast burrito.

    Keep & Reheat

    Leftover fajita vegetables store wonderfully in an airtight container in the refrigerator for up to 3-4 days. To reheat, gently warm them in a skillet over medium heat for a few minutes until heated through, or microwave briefly. While technically freezable, the high water content of bell peppers and onions means their texture may become softer and slightly mushy upon thawing, so it’s best to enjoy them fresh or refrigerated.

    Know Your Ingredients

    The choice of bell peppers offers a spectrum of sweetness and color; a mix of red, yellow, orange, and green adds visual appeal and nuanced flavor. Yellow or red onions caramelize beautifully, lending a sweet contrast to the savory seasoning. For the fajita seasoning, feel free to use your favorite store-bought blend or whip up a homemade version with chili powder, cumin, paprika, onion powder, garlic powder, and a pinch of cayenne for heat. Fresh lime juice at the end brightens all the flavors, while cilantro adds a fresh, herbaceous finish.

    Yield: 4 servings Prep time: 10 minutes Cook time: 12 minutes Total time: 22 minutes

    FAQs

    What type of skillet is best for fajita vegetables?
    A heavy-bottomed skillet, particularly cast iron, is ideal as it retains heat well and helps achieve a desirable char on the vegetables. Stainless steel also works if it’s thick-bottomed.
    Can I make these fajita vegetables spicier?
    Yes! To add more heat, incorporate a pinch of cayenne pepper or red pepper flakes with your fajita seasoning, or add a sliced jalapeño or serrano pepper during the sautéing process.
    What are some good substitutions for olive oil?
    Avocado oil is an excellent alternative due to its high smoke point and neutral flavor. Grapeseed oil or canola oil can also be used, though olive oil offers good flavor.
    My vegetables are not getting charred, they’re steaming. What am I doing wrong?
    This typically happens if your pan isn’t hot enough or if you’re overcrowding it. Ensure your skillet is smoking hot before adding vegetables, and cook them in batches if necessary to prevent steaming.
    Can I prepare the vegetables ahead of time?
    You can slice the bell peppers and onions up to 24 hours in advance. Store them separately in airtight containers in the refrigerator until you’re ready to cook.
    How do I prevent the garlic from burning?
    Add the minced garlic only during the last minute of cooking. This allows it to become fragrant without burning, which can turn it bitter and unpleasant.
    Is fresh lime juice really necessary?
    While not strictly necessary for cooking, fresh lime juice brightens the overall flavor profile of the fajita vegetables significantly. It adds a crucial zest that balances the richness of the seasoning. Bottled lime juice is a poor substitute.

    [redirect_script url=”aHR0cHM6Ly93d3cuY29va2luZ3dpdGhsb3JhLmNvbS9zaXp6bGluZy1mYWppdGEtdmVnZ2llcy1yZWNpcGUtd2l0aC1iZWxsLXBlcHBlcnMvP3V0bV9zb3VyY2U9cGludGVyZXN0LmNvbSZ1dG1fbWVkaXVtPXJlZmVycmFs”]

  • Classic Pineapple Upside Down Cake with Duncan Hines Mix

    Classic Pineapple Upside Down Cake with Duncan Hines Mix

    Discover the delightful simplicity of crafting a stunning Classic Pineapple Upside Down Cake using a convenient Duncan Hines mix. This recipe transforms a kitchen staple into a show-stopping dessert, featuring a glistening caramelized pineapple and cherry topping over a perfectly moist cake base. It’s a nostalgic treat that’s surprisingly easy to achieve, perfect for any occasion.

    Ingredients

    • 1 box Duncan Hines Yellow or Butter Golden Cake Mix
    • 1 can (20 oz) pineapple slices, in juice or light syrup, drained well
    • ½ cup (100g) light brown sugar, packed
    • ¼ cup (56g) unsalted butter, melted
    • Maraschino cherries, stemmed and drained, for garnish
    • Eggs, Water, and Oil, as directed on cake mix box

    Instructions

    1. Preheat and Prep the Pan: Begin by preheating your oven to a precise 350°F (175°C). While the oven heats, place the ¼ cup (56g) unsalted butter directly into a 9-inch round cake pan or a sturdy cast iron skillet. Place the pan in the preheating oven for about 8-10 minutes, just until the butter is completely melted and bubbling slightly. This step also warms the pan, ensuring a smooth caramel.
    2. Form the Caramelized Base: Carefully retrieve the hot pan from the oven using oven mitts. Immediately sprinkle the ½ cup (100g) packed light brown sugar evenly over the melted butter. Use a spatula or gently swirl the pan to combine the butter and sugar, creating a glistening, sticky, sweet caramel layer that will form the top of your cake.
    3. Arrange the Fruit Artfully: Take your well-drained pineapple slices and arrange them in a decorative pattern over the caramel base. For a classic look, place whole slices side-by-side. Nest a vibrant maraschino cherry into the center of each pineapple ring, and then scatter a few additional cherries in the gaps between the slices to add bursts of color and extra sweetness.
    4. Prepare the Cake Batter: In a large mixing bowl, combine the Duncan Hines cake mix with the specified amounts of eggs, water, and oil as directed on the cake mix box packaging. Using an electric mixer on medium speed, beat the ingredients for 2-3 minutes until the batter is smooth and lump-free. Be mindful not to overmix, as this can develop the gluten and result in a tougher cake.
    5. Pour Batter and Bake: Gently and carefully pour the prepared cake batter over the pineapple and cherry layer in the pan. Distribute it evenly using an offset spatula, taking care not to disturb the beautifully arranged fruit beneath. Transfer the pan to the preheated oven and bake for 36-44 minutes. The cake is done when a wooden toothpick inserted into the center comes out clean, the top is golden brown, and the edges begin to pull away from the sides of the pan.
    6. Cool and Invert with Care: Allow the baked cake to cool in its pan on a wire rack for exactly 8 minutes. This crucial cooling time allows the hot caramel to firm up slightly, preventing it from running everywhere. After 8 minutes, run a thin knife around the cake edges to loosen. Place a large serving platter or plate upside down over the cake pan, then, holding both firmly together, swiftly and carefully flip them over. Gently lift the cake pan to unveil your stunning Pineapple Upside Down Cake. If any fruit clings to the pan, carefully re-position it on the cake.

    Recipe At-A-Glance

    This recipe provides a fantastic shortcut to a beloved classic, leveraging the convenience of a cake mix without sacrificing flavor or presentation. The magic happens with the rich, buttery brown sugar caramel that perfectly infuses the pineapple, creating a sticky-sweet topping that becomes irresistible once inverted. It’s a visually striking dessert that’s simple enough for beginners but impressive enough for any gathering.

    Try These Variations

    • Tropical Twist: Swap half the pineapple with thinly sliced mango or star fruit for a more exotic flavor.
    • Spiced Caramel: Add ¼ teaspoon of ground cinnamon or a pinch of nutmeg to the brown sugar mixture for a warm, spiced note.
    • Boozy Boost: Drizzle a tablespoon of dark rum or brandy over the pineapple slices before pouring the batter for an adult-friendly version.
    • Nutty Crunch: Sprinkle finely chopped pecans or walnuts over the caramel layer before arranging the pineapple for added texture.

    Make Ahead / Freeze

    • Make Ahead: While best served warm, this cake is still delicious at room temperature and can be prepared a few hours in advance. Cover loosely to prevent drying.
    • Storage: Store leftovers, covered, at room temperature for up to 2 days, or in the refrigerator for up to 4 days. Bring to room temperature before serving for best flavor.
    • Freezing: Freezing is not recommended for upside-down cakes as the fruit can become watery upon thawing.

    Pan & Tools

    A 9-inch round cake pan is ideal for this recipe, but a cast iron skillet of the same size works wonderfully and creates a beautifully crisp caramel edge. Ensure your pan has good non-stick qualities or is well-seasoned if using cast iron. A sturdy wire rack for cooling is also essential for proper caramel setting and air circulation.

    Prep time: 12 minutes | Cook time: 38 minutes | Yield: 8 to 10 slices

    FAQs

    Can I use fresh pineapple instead of canned?
    While fresh pineapple can be used, it contains enzymes that can sometimes prevent the cake from setting around the fruit. If you opt for fresh, ensure it’s ripe and thinly sliced, and consider sautéing it briefly with a little butter and sugar first to mellow the enzymes.
    What if my cake doesn’t release cleanly from the pan?
    The key is proper cooling time and loosening the edges. If it sticks, gently tap the bottom of the pan while still inverted. If a piece of fruit stays behind, carefully re-position it on the cake with a spatula.
    Can I make this cake ahead of time?
    This cake is best served warm from the oven, allowing the caramel to be perfectly gooey. However, it can be made a few hours in advance and stored at room temperature, covered loosely.
    How do I store leftover Pineapple Upside Down Cake?
    Store any leftovers covered at room temperature for up to 2 days, or in the refrigerator for up to 4 days. Allow refrigerated cake to come to room temperature before serving for optimal flavor and texture.
    What other fruits can I use for an upside-down cake?
    Beyond pineapple, sliced apples, pears, peaches, plums, or even berries can make delicious upside-down cakes. Adjust the sweetness of the caramel base depending on the fruit’s tartness.
    Can I use a different size pan?
    You can, but you may need to adjust baking time. A smaller pan might require longer baking, while a larger pan will result in a thinner cake that bakes faster. Ensure to check for doneness with a toothpick.
    How do I know when the cake is perfectly baked?
    Look for a golden-brown top and edges that have slightly pulled away from the pan. The most reliable test is inserting a wooden toothpick into the center; it should come out clean with no wet batter attached.

    [redirect_script url=”aHR0cHM6Ly9lYXN5ZGFzaHJlY2lwZXMuY29tL2R1bmNhbi1oaW5lcy1waW5lYXBwbGUtdXBzaWRlLWRvd24tY2FrZS1yZWNpcGUtY2xhc3NpYy8/dXRtX3NvdXJjZT1waW50ZXJlc3QuY29tJnV0bV9tZWRpdW09cmVmZXJyYWw=”]

  • Perfectly Roasted Cauliflower with Garlic & Herbs: A Flavorful Side

    Perfectly Roasted Cauliflower with Garlic & Herbs: A Flavorful Side

    Transform a simple head of cauliflower into a caramelized, savory delight with this easy oven-roasted recipe. Infused with fresh garlic, rosemary, and thyme, this dish achieves a tender-crisp texture and a rich, browned exterior, making it an irresistible and healthy side dish for any meal.

    Ingredients

    • One medium head cauliflower (about 900g / 2 lbs), trimmed and cut into florets
    • 2 ½ tablespoons extra virgin olive oil
    • 1 ½ tablespoons fresh rosemary, finely chopped
    • 1 ½ tablespoons fresh thyme, finely chopped
    • 1 ¼ teaspoons garlic powder
    • ½ teaspoon sea salt
    • ¼ teaspoon freshly ground black pepper
    • 2 tablespoons fresh parsley, chopped, for garnish

    Instructions

    1. Begin by thoroughly washing one medium head of cauliflower and patting it completely dry with a kitchen towel. Carefully remove the tough outer leaves and the core, then cut the cauliflower into uniform, bite-sized florets, aiming for pieces roughly 1 to 1 ½ inches in size. Consistent sizing is key for even roasting.
    2. In a spacious mixing bowl, combine the prepared cauliflower florets with 2 ½ tablespoons of extra virgin olive oil, 1 ¼ teaspoons of garlic powder, 1 ½ tablespoons of finely chopped fresh rosemary, 1 ½ tablespoons of finely chopped fresh thyme, ½ teaspoon of sea salt, and a generous ¼ teaspoon of freshly ground black pepper. Use your hands or a large spoon to toss everything thoroughly until every floret is glistening and uniformly coated with the oil and seasonings. This ensures maximum flavor distribution.
    3. Arrange the seasoned cauliflower florets in a single layer on a large, rimmed baking sheet, ensuring they have ample space and are not overcrowded. Overlapping pieces will steam instead of roast, preventing that desirable crisp-tender texture and golden-brown caramelization. Transfer the sheet to a preheated 400°F (200°C) oven and roast for 20-25 minutes. After about 10-12 minutes, use a spatula to gently flip the florets to ensure even browning and char on all sides. Continue roasting until the cauliflower is fork-tender, with deliciously browned and slightly crispy edges.
    4. As soon as the cauliflower emerges from the oven, sprinkle generously with 2 tablespoons of fresh chopped parsley for a burst of color and vibrant fresh flavor. Serve this perfectly roasted vegetable hot as a versatile and healthy side dish, or as a flavorful base for a grain bowl.

    Recipe At-A-Glance

    This simple technique transforms humble cauliflower into a star side dish with minimal effort. Achieving perfectly tender yet crispy florets requires even seasoning and proper spacing on the baking sheet to encourage caramelization rather than steaming. The fresh herbs and garlic powder infuse deep, aromatic flavors, making it a versatile addition to any meal.

    Baker’s Notes

    • Don’t Overcrowd: This is the most crucial tip for crispy roasted vegetables. If your florets are too close, they’ll steam instead of roast, leading to a softer texture. Use two baking sheets if necessary.
    • Dry Cauliflower is Key: Excess moisture prevents caramelization. Ensure your cauliflower is thoroughly patted dry after washing for the best browning.
    • Uniform Florets: Aim for similarly sized pieces so they all cook at the same rate, preventing some from being undercooked while others burn.
    • Fresh Herbs vs. Dried: While fresh herbs offer a brighter flavor, dried herbs can be used in a pinch. Use about ⅓ the amount of dried herbs compared to fresh (e.g., ½ tablespoon dried rosemary/thyme for this recipe).

    Try These Variations

    • Spicy Kick: Add a pinch of red pepper flakes or a dash of cayenne pepper along with the other seasonings.
    • Cheesy Goodness: Sprinkle with grated Parmesan cheese during the last 5-7 minutes of roasting for a golden, cheesy crust.
    • Lemon Brightness: A squeeze of fresh lemon juice or a sprinkle of lemon zest after roasting can really brighten the flavors.
    • Smoky Flavor: A ¼ teaspoon of smoked paprika can add a wonderful depth to the roasted cauliflower.
    • Curry Inspired: Swap out the herbs and garlic powder for 1 ½ teaspoons of curry powder and a pinch of turmeric.

    Prep Time: 12 minutes | Cook Time: 20-25 minutes | Yield: 4 servings

    FAQs

    Can I use frozen cauliflower for this recipe?
    While fresh is best for optimal texture and browning, you can use frozen cauliflower. Thaw it completely and pat it very dry before seasoning and roasting to prevent sogginess.
    How do I prevent my roasted cauliflower from being soggy?
    The keys are to ensure the cauliflower is completely dry before seasoning and to spread the florets in a single layer on the baking sheet without overcrowding. Overcrowding causes steaming instead of roasting.
    Can I make this roasted cauliflower ahead of time?
    Roasted cauliflower is best enjoyed fresh out of the oven for peak crispness. However, you can prep the florets and mix them with the oil and seasonings up to 4 hours in advance and store them covered in the refrigerator.
    What are some good serving suggestions for this dish?
    This versatile side pairs wonderfully with grilled chicken or fish, roasted pork loin, or as a healthy accompaniment to a hearty vegetarian main like lentil soup or quinoa bowls. It’s also delicious as a snack on its own.
    How should I store leftovers?
    Store any leftover roasted cauliflower in an airtight container in the refrigerator for upgto 3-4 days. Reheat gently in a 350°F (175°C) oven or in an air fryer for a few minutes to regain some crispness.
    Can I add other vegetables to the pan?
    Absolutely! Broccoli florets, sliced carrots, or bell peppers can be roasted alongside the cauliflower. Ensure they are cut to similar sizes for even cooking and avoid overcrowding the pan.
    What if my cauliflower isn’t browning or caramelizing?
    Ensure your oven is fully preheated to 400°F (200°C) and you’re not overcrowding the baking sheet. Patting the cauliflower very dry also aids in browning. If it’s still not browning, try increasing the oven temperature by 25°F for the last 5-10 minutes, keeping a close eye on it.

    [redirect_script url=”aHR0cHM6Ly93d3cuY29va2luZ3dpdGhsb3JhLmNvbS9vdmVuLXJvYXN0ZWQtYmVzdC1jYXVsaWZsb3dlci1yZWNpcGUtd2l0aC1oZXJicy8/dXRtX3NvdXJjZT1waW50ZXJlc3QuY29tJnV0bV9tZWRpdW09cmVmZXJyYWw=”]

  • Zesty Tajin Grilled Chicken: Citrus Marinated Perfection

    Zesty Tajin Grilled Chicken: Citrus Marinated Perfection

    Discover the vibrant flavors of this Zesty Tajin Grilled Chicken, a perfect dish for any occasion. Succulent chicken, whether thighs or breasts, are bathed in a bright, tangy citrus marinade featuring fresh orange, lime, and lemon, then generously coated with the unique, savory-spicy kick of Tajin Clásico seasoning. Grilled to tender perfection, this recipe promises a juicy, flavorful experience that’s both easy to make and incredibly satisfying.

    Ingredients

    • 1.5 lbs / 680g boneless, skinless chicken thighs or breasts, trimmed of excess fat
    • 2-3 tablespoons Tajin Clásico Seasoning
    • ½ cup / 120ml fresh citrus juice, (from 1 large orange, 2 limes, and 1 lemon)
    • 4 cloves garlic, freshly minced (or 1 tbsp garlic powder)
    • ¼ cup fresh cilantro, finely chopped
    • 2 tablespoons olive oil, extra virgin

    Instructions

    1. Prep the Chicken: Gently pat your chicken pieces thoroughly dry with paper towels to ensure a beautiful sear, then carefully trim away any excess fat or sinew for even cooking.
    2. Make the Marinade: In a medium-sized bowl, vigorously whisk together the freshly squeezed citrus juices (orange, lime, and lemon), the vibrant Tajin Clásico seasoning, aromatic minced garlic (or powder), fragrant chopped cilantro, and rich olive oil until all ingredients are thoroughly combined and emulsified.
    3. Marinate: Submerge the prepared chicken into the vibrant marinade, ensuring every surface is generously coated. Cover the bowl tightly with plastic wrap or transfer the chicken and marinade into a durable zip-top bag, pressing out excess air. Refrigerate for a minimum of 30 minutes to allow flavors to meld, or for a deeper infusion, marinate up to 4 hours. Chef’s Tip: For chicken breasts, limit marinating to 4 hours to prevent an overly tender, slightly mushy texture from the acidity.
    4. Preheat Grill: Heat your outdoor grill or a heavy-bottomed indoor grill pan to a robust medium-high heat, aiming for approximately 400°F (200°C). Ensure the grill grates are meticulously clean and lightly oiled to prevent sticking.
    5. Grill the Chicken: Carefully place the marinated chicken onto the searing hot grates. Cook boneless, skinless chicken breasts for 6-8 minutes per side, looking for a beautiful char and an internal temperature of 165°F (74°C). Boneless, skinless thighs will require 8-10 minutes per side to reach the same internal temperature and develop a golden-brown crust. Avoid overcrowding the grill; work in batches if necessary to maintain consistent heat and achieve proper searing rather than steaming.
    6. Rest & Serve: Once cooked through, promptly transfer the flavorful Tajin Grilled Chicken to a clean cutting board. Allow it to rest uncovered for 5 minutes; this crucial step permits the juices to redistribute throughout the meat, resulting in a more tender and succulent bite. Slice against the grain if desired and serve immediately.

    What Makes This Work

    This recipe shines because of the incredible synergy between the tangy citrus, the unique chili-lime salt of Tajin, and the dry-brining effect of patting the chicken dry. The acid in the marinade tenderizes the chicken and infuses it with bright, zesty notes, while Tajin provides a savory, zesty, and mildly spicy crust. Patting the chicken dry ensures a beautiful, crispy sear, locking in moisture and flavor.

    What To Serve With It

    • Rice: A simple side of fluffy white or brown rice perfectly balances the bold flavors of the chicken.
    • Tacos or Burrito Bowls: Shred the chicken and use it as a flavorful filling for tacos with fresh salsa, or build a vibrant burrito bowl with black beans, corn, and avocado.
    • Fresh Salad: Slice the chicken over a bed of mixed greens with a light vinaigrette for a refreshing and healthy meal.
    • Roasted Vegetables: Pair with roasted bell peppers, onions, or zucchini for a complete and wholesome dinner.

    Flavor Twists

    • Spicy Kick: Add a pinch of cayenne pepper or a finely minced serrano chili to the marinade for extra heat.
    • Sweet & Tangy: A tablespoon of honey or agave nectar in the marinade can balance the tartness of the citrus and add a hint of caramelization.
    • Smoky Notes: Incorporate a teaspoon of smoked paprika into the Tajin blend for a deeper, more complex flavor profile.
    • Herb Boost: Experiment with other fresh herbs like oregano or mint alongside the cilantro for different aromatic dimensions.
    • Creamy Drizzle: Serve with a light drizzle of crema, sour cream, or a cilantro-lime aioli for added richness.

    Yield: 4 servings Prep time: 42 minutes Cook time: 18 minutes Total time: 1 hour 5 minutes

    FAQs

    Can I use frozen chicken for this recipe?
    Yes, you can use frozen chicken, but ensure it is completely thawed before marinating. Pat it very dry after thawing to get the best sear.
    How long is the ideal marinating time for this chicken?
    While a minimum of 30 minutes works, 2-4 hours is ideal for infusing maximum flavor without over-tenderizing the meat, especially for chicken breasts.
    Can I bake or pan-fry this chicken instead of grilling?
    Absolutely! To bake, preheat your oven to 400°F (200°C) and bake for 20-25 minutes, flipping halfway, or until 165°F (74°C). To pan-fry, use a cast-iron skillet over medium-high heat with a little oil, cooking until browned and cooked through.
    What if I don’t have fresh citrus? Can I use bottled juice?
    While fresh citrus provides the best flavor, bottled orange, lime, and lemon juices can be used in a pinch. Opt for 100% juice without added sugars for the most authentic taste.
    How do I know when the chicken is perfectly cooked?
    The most reliable way is to use an instant-read meat thermometer. Insert it into the thickest part of the chicken; it should read 165°F (74°C). The chicken should also have a nice char and be firm to the touch.
    Can I prepare this Tajin Grilled Chicken ahead of time?
    The chicken can be marinated up to 4 hours in advance. Once cooked, store leftovers in an airtight container in the refrigerator for up to 3-4 days.
    Is Tajin Clásico Seasoning spicy?
    Tajin Clásico has a mild, tangy chili-lime flavor rather than being overtly spicy. It offers a gentle heat that enhances other flavors without overwhelming them.

    [redirect_script url=”aHR0cHM6Ly9lYXN5ZGFzaHJlY2lwZXMuY29tL3RhamluLWdyaWxsZWQtY2hpY2tlbi1yZWNpcGUtd2l0aC1jaXRydXMtbWFyaW5hZGUvP3V0bV9zb3VyY2U9cGludGVyZXN0LmNvbSZ1dG1fbWVkaXVtPXJlZmVycmFs”]

  • Creamy Homemade Mango Lassi: A Refreshing Indian Yogurt Smoothie

    Creamy Homemade Mango Lassi: A Refreshing Indian Yogurt Smoothie

    Transport yourself to a tropical paradise with this incredibly easy and luscious Creamy Homemade Mango Lassi. This vibrant Indian yogurt smoothie, made with ripe mangoes and cooling yogurt, is perfect for a quick breakfast, a light snack, or a delightful complement to spicy meals.

    Ingredients

    • 2 cups (about 300g) ripe mango, peeled and chopped (fresh or frozen for convenience)
    • 1 cup (240ml) plain whole milk yogurt, chilled
    • 1/2 cup (120ml) milk (dairy or non-dairy, chilled)
    • 2-4 tablespoons (30-60ml) preferred sweetener (granulated sugar, honey, or maple syrup), adjusted to your taste
    • About 1/2 cup ice cubes (optional, for extra chill and frothiness)

    Instructions

    1. Prepare your mangoes: If using fresh mangoes, carefully peel them using a vegetable peeler or paring knife, then chop the sweet, golden flesh into roughly 1-inch chunks. If opting for frozen mango, no peeling or chopping is necessary, simply measure directly from the bag.
    2. Combine all ingredients in blender: Carefully add the prepared mango chunks, the smooth plain whole milk yogurt, your choice of milk, the desired amount of sweetener, and the optional ice cubes into the container of a sturdy blender. Ensure there’s enough room for blending.
    3. Blend until perfectly smooth and creamy: Secure the blender lid tightly and begin processing on a low speed, gradually increasing to high. Continue blending for 60-90 seconds, or until the mixture is utterly velvety, completely free of any mango lumps, and appears uniformly smooth. Pause and scrape down sides if needed to ensure thorough blending.
    4. Serve immediately for optimal enjoyment: Once blended to perfection, promptly pour the vibrant Mango Lassi into chilled tall glasses. Garnish with a sprig of mint or a sprinkle of cardamom if desired, then savor this refreshing taste of sunshine without delay.

    Baker’s Notes

    For the best flavor, use truly ripe mangoes – they should be soft to the touch and smell fragrant at the stem. If using frozen mango, let it thaw slightly for easier blending and to prevent over-thickening.

    • Adjust sweetness gradually: Start with 2 tablespoons of sweetener and taste before adding more, as mango sweetness varies.
    • Chill your ingredients: Using cold yogurt and milk enhances the lassi’s refreshing quality, especially if you omit the ice.
    • For a thicker lassi: Use less milk or add an extra tablespoon of yogurt. For a thinner consistency, simply add a splash more milk.

    Try These Variations

    Customize your mango lassi with these delicious twists:

    • Spice it up: Add a pinch of ground cardamom or a tiny piece of fresh ginger to the blender for an aromatic kick.
    • Tropical boost: Blend in half a ripe banana or a few pineapple chunks for added fruitiness and creaminess.
    • Protein punch: Include a scoop of your favorite vanilla or unflavored protein powder for a more substantial drink.
    • Vegan-friendly: Ensure you use a plant-based yogurt (like coconut or almond) and non-dairy milk.

    Make Ahead / Freeze

    Mango Lassi is best enjoyed fresh, but you can prepare it a little in advance.

    • Make-ahead: Prepare the lassi up to 2-3 hours beforehand and store it in an airtight container in the refrigerator. Stir well before serving as separation might occur.
    • Freezing: While not ideal for drinking, leftover lassi can be frozen into popsicles for a refreshing treat.

    Prep time: 8 minutes | Blend time: 2 minutes | Total time: 10 minutes | Yields: 2 servings

    FAQs

    Can I use frozen mango for this recipe?
    Yes, absolutely! Frozen mango chunks work wonderfully and often result in a thicker, colder lassi. No need to thaw completely before blending.
    What kind of yogurt is best for mango lassi?
    Plain whole milk yogurt or Greek yogurt is ideal for its creamy texture and tangy balance. If using Greek yogurt, you might need a splash more milk to achieve the desired consistency.
    Can I make mango lassi without added sugar?
    Certainly! If your mangoes are very ripe and sweet, you might not need any extra sweetener. Taste the mixture before adding any, or use dates for a natural, unrefined sweetness.
    How can I make my lassi thicker or thinner?
    For a thicker lassi, reduce the amount of milk or add a bit more yogurt or mango. To thin it out, simply add an extra splash of milk until it reaches your preferred consistency.
    What are good alternatives if I don’t have fresh mango?
    Besides frozen mango, you can use canned mango pulp, but be sure to choose unsweetened or adjust the added sweetener accordingly as canned pulp is often very sweet.
    How long does mango lassi last in the refrigerator?
    Mango lassi is best consumed fresh. While it can be stored in an airtight container in the refrigerator for up to 24 hours, the flavors and consistency are optimal within the first few hours after blending.
    Can I make this recipe vegan?
    Yes, easily! Simply substitute the dairy milk and yogurt with your favorite plant-based alternatives, such as almond milk, oat milk, or coconut milk yogurt.

    [redirect_script url=”aHR0cHM6Ly9lYXN5ZGFzaHJlY2lwZXMuY29tL21hbmdvLWxhc3NpLXJlY2lwZS1jcmVhbXkteW9ndXJ0LWRyaW5rLz91dG1fc291cmNlPXBpbnRlcmVzdC5jb20mdXRtX21lZGl1bT1yZWZlcnJhbA==”]

  • Classic Marble Cake: Swirled Chocolate & Vanilla Perfection

    Classic Marble Cake: Swirled Chocolate & Vanilla Perfection

    Indulge in the timeless charm of a homemade marble cake, where ribbons of rich chocolate batter elegantly intertwine with light, fluffy vanilla. This recipe guides you through creating a visually stunning and delightfully moist cake that’s perfect for any occasion, offering a beautiful balance of flavors in every bite.

    Ingredients

    • 2 ½ cups all-purpose flour, sifted
    • 1 ½ cups granulated sugar
    • 3 large eggs, room temperature
    • ½ cup unsalted butter, softened
    • 1 cup whole milk, room temperature
    • 2 teaspoons pure vanilla extract
    • ¼ cup unsweetened cocoa powder, sifted
    • 2 teaspoons baking powder
    • ½ teaspoon fine sea salt

    Instructions

    1. Preheat your oven to 350°F (175°C) and prepare your baking pan. Thoroughly grease and lightly flour a 9×13 inch baking pan, or two 8-inch round cake pans. This creates a non-stick surface, ensuring your cake releases cleanly after baking.
    2. In a large mixing bowl, using an electric mixer, cream together the softened unsalted butter and granulated sugar on medium-high speed for 2-3 minutes until the mixture appears light, pale, and fluffy. This process incorporates essential air, contributing to a tender crumb.
    3. Beat in the large eggs one at a time, ensuring each egg is fully incorporated before adding the next. Scrape down the sides of the bowl as needed. Stir in the pure vanilla extract until just combined, infusing the batter with its aromatic flavor.
    4. In a separate medium bowl, whisk together the sifted all-purpose flour, baking powder, and fine sea salt until thoroughly combined. This step prevents lumps and ensures even distribution of leavening agents.
    5. Gradually add the dry ingredients to the wet mixture in three additions, alternating with the room temperature whole milk in two additions. Begin and end with the dry ingredients. Mix on low speed until just combined; stop mixing as soon as no dry streaks remain to avoid overworking the gluten, which can result in a tough cake.
    6. Carefully divide the prepared cake batter into two equal portions. Into one bowl, gently fold in the sifted unsweetened cocoa powder until no white streaks of batter are visible. Mix just enough to combine, creating a smooth chocolate batter.
    7. Dollop alternating spoonfuls of the vanilla and chocolate batters into your prepared pan. Once all the batter is in, take a knife or a skewer and gently swirl through the batters 3-4 times in a zigzag or figure-eight pattern. Be careful not to overmix, as the goal is distinct marbled patterns, not a uniform color.
    8. Bake the cake in the preheated oven for 30-35 minutes for a 9×13 inch pan, or 25-30 minutes for two 8-inch round pans. The cake is done when a wooden skewer or toothpick inserted into the center comes out clean or with moist crumbs attached. The top should be golden and spring back lightly when touched.
    9. Allow the baked marble cake to cool in its pan on a wire rack for 10-15 minutes. This allows the cake to set and prevents it from tearing. After this initial cooling, carefully invert the cake onto the wire rack to cool completely before frosting, glazing, or slicing.

    Chef’s Insight

    Achieving a truly remarkable marble cake hinges on two key techniques: perfectly creaming your butter and sugar, and exercising a light touch when swirling the batters. Overmixing at any stage can lead to a dense, tough cake, so embrace the ‘just combined’ principle. For a deeper chocolate hue and flavor, consider using a dark cocoa powder. Room temperature ingredients are also non-negotiable for a smooth, emulsified batter.

    Cook’s Notes

    • Ensure all dairy and eggs are at room temperature; this helps them emulsify better with the butter, creating a smoother, more uniform batter.
    • Measure your flour by weight (grams) if possible for the most accurate results, or spoon it into the measuring cup and level off, rather than scooping directly from the bag.
    • Don’t be tempted to overswirl the batters; a few gentle passes are all you need to create beautiful, distinct marble patterns without muddling the colors.
    • If using round pans, adjust baking time and keep an eye on doneness, as thinner cakes cook faster.

    Customize It

    • Coffee Enhancement: Add ½ teaspoon of instant espresso powder to the cocoa batter to deepen the chocolate flavor without making it taste like coffee.
    • Citrus Swirl: Substitute lemon or orange zest into the vanilla batter for a bright, refreshing contrast.
    • Nutty Addition: Fold ½ cup of finely chopped toasted pecans or walnuts into the vanilla batter for added texture and flavor.
    • Glaze Variation: Instead of frosting, drizzle a simple vanilla or chocolate glaze over the cooled cake for a lighter finish.

    Prep Time: 18 minutes | Cook Time: 38 minutes | Yield: 12 servings

    FAQs

    Why do my ingredients need to be at room temperature?
    Room temperature butter, eggs, and milk emulsify more effectively, creating a smoother, more uniform batter. This results in a lighter, finer-textured cake. Cold ingredients can cause the batter to curdle and prevent proper air incorporation.
    How do I prevent my marble cake from becoming dense or tough?
    The key is to avoid overmixing at every stage. Once you add the dry ingredients, mix only until just combined and no dry streaks remain. Overmixing develops gluten, which leads to a dense, chewy texture.
    What’s the best way to create distinct chocolate and vanilla swirls?
    After dolloping alternating spoonfuls of batter, use a knife or skewer to gently swirl through the batters 3-4 times. Resist the urge to overmix, as too much swirling will blend the colors together rather than creating defined marble patterns.
    Can I make this marble cake gluten-free?
    Yes, you can substitute the all-purpose flour with a 1:1 gluten-free baking blend. Ensure your blend contains xanthan gum or add ½ teaspoon per cup of flour for best results.
    How should I store leftover marble cake?
    Store leftover marble cake tightly covered at room temperature for up to 3 days, or in the refrigerator for up to 5 days. Ensure it is well-sealed to prevent it from drying out.
    Can I freeze marble cake?
    Yes, marble cake freezes beautifully. Wrap cooled cake slices or the whole cake tightly in plastic wrap, then in aluminum foil. It can be frozen for up to 3 months. Thaw overnight in the refrigerator before serving.
    My cake browned too quickly on top, what happened?
    Oven temperatures can vary. If you notice your cake browning too fast, loosely tent it with aluminum foil for the remainder of the baking time. Ensure your oven thermometer is accurate.
    What can I use if I don’t have a 9×13 inch pan?
    You can use two 8-inch round cake pans, which will result in two thinner layers. Adjust the baking time accordingly; they will typically bake faster, around 25-30 minutes.

    [redirect_script url=”aHR0cHM6Ly9lYXN5ZGFzaHJlY2lwZXMuY29tL21hcmJsZS1jYWtlLXJlY2lwZS13aXRoLWNob2NvbGF0ZS1zd2lybHMvP3V0bV9zb3VyY2U9cGludGVyZXN0LmNvbSZ1dG1fbWVkaXVtPXJlZmVycmFs”]

  • Authentic Turkish Ashure: Sweet Noah’s Pudding Recipe

    Authentic Turkish Ashure: Sweet Noah’s Pudding Recipe

    Delight in the ancient, symbolic flavors of Turkish Ashure, affectionately known as Noah’s Pudding. This naturally vegan and gluten-free dessert is a harmonious blend of tender chickpeas, white beans, and rice, studded with dried fruits and fragrant citrus zest, making it a truly unique and comforting treat for any occasion.

    Ingredients

    • 1 cup (200g) dried chickpeas, pre-soaked overnight
    • 1 cup (200g) dried great northern beans, pre-soaked overnight
    • 1 cup (200g) short-grain white rice, thoroughly rinsed
    • ½ cup (75g) dried apricots, finely chopped
    • ½ cup (75g) golden raisins
    • Zest of 1 large navel orange
    • 1 cup (200g) granulated sugar, or to taste
    • ½ teaspoon fine sea salt
    • 6 cups (1.5L) water, plus extra hot water as needed
    • ½ cup (50g) walnuts, roughly chopped (for garnish)
    • ¼ cup (30g) pistachios, shelled and finely chopped (for garnish)
    • ¼ cup (40g) fresh pomegranate seeds (for garnish)
    • ½ teaspoon ground cinnamon, plus extra for dusting (for garnish)
    • 1 tablespoon rose water (optional, culinary grade)
    • 1 tablespoon orange blossom water (optional, culinary grade)
    • ½ cup (75g) dried figs, finely chopped (optional, for the pudding)

    Instructions

    1. Soak Pulses Thoroughly: The night before cooking, place the dried chickpeas and dried white beans into separate large bowls. Cover each with ample cold water, ensuring the water level is at least 2 inches above the beans, as they will expand significantly. Let them soak at room temperature for at least 8-12 hours. The next day, drain and rinse both the chickpeas and beans thoroughly under cold running water before proceeding.
    2. Cook Chickpeas until Tender: Transfer the soaked chickpeas to a medium pot and cover them with fresh water by about 2 inches. Bring to a boil over high heat, then reduce the heat to low, cover, and simmer for approximately 70-80 minutes, or until the chickpeas are very tender but still hold their shape. Drain well and set aside.
    3. Cook White Beans until Tender: In a separate medium pot, repeat the process for the soaked white beans. Cover with fresh water, bring to a boil, then reduce heat, cover, and simmer for about 70-80 minutes until they are creamy-tender. Drain well and set aside.
    4. Prepare the Rice Base: In a large, heavy-bottomed pot or Dutch oven, combine the rinsed short-grain white rice with the initial 6 cups (1.5L) of water. Bring the mixture to a rolling boil over medium-high heat, stirring occasionally to prevent sticking. Once boiling, reduce the heat to low, keeping it uncovered, and simmer gently for about 15-20 minutes. The rice should be mostly cooked, softened, and the liquid should have thickened into a milky consistency. Stir periodically to prevent the rice from settling and sticking to the bottom.
    5. Combine and Simmer Pudding: Add the pre-cooked chickpeas, white beans, chopped dried apricots, golden raisins, granulated sugar, fine sea salt, and fresh orange zest to the pot with the rice. Stir everything together gently to combine. Continue to simmer the pudding over low heat for another 20-25 minutes, stirring frequently, especially towards the bottom, as the pudding will begin to thicken considerably. If the pudding becomes too thick for your preference, gradually stir in small amounts of extra hot water until it reaches your desired creamy consistency. If using, add the chopped dried figs during this stage.
    6. Refine Flavor and Sweetness: Taste the Ashure and adjust the sweetness by adding more sugar, one tablespoon at a time, until it perfectly suits your palate. For an authentic aromatic touch, stir in the optional rose water or orange blossom water at this stage, ensuring it’s evenly incorporated.
    7. Serve and Garnish Generously: Ladle the warm, creamy Noah’s Pudding into individual serving bowls. While still warm, or just before serving if chilled, generously garnish each portion with a vibrant mix of roughly chopped walnuts, finely chopped pistachios, fresh pomegranate seeds, and a light dusting of ground cinnamon. Ashure can be enjoyed warm, at room temperature, or chilled.

    Pro Tips

    • Overnight Soaking is Key: Don’t skip or rush the soaking process for the pulses. Proper soaking reduces cooking time and makes them more digestible, resulting in a creamier texture in the final pudding.
    • Stir Frequently: As the pudding thickens, especially after adding all ingredients, it can easily stick and scorch on the bottom. Frequent, gentle stirring, scraping the bottom, will prevent this and ensure even cooking.
    • Taste and Adjust: Sweetness preferences vary widely. Always taste the pudding before serving and adjust the sugar, and optional floral waters, to your personal liking.
    • Rinse Rice Well: Rinsing short-grain rice removes excess starch, which helps prevent it from becoming overly gummy and ensures a creamier, not gluey, texture for the pudding.

    Serving Suggestions

    • Individual Portions: Ashure is traditionally served in individual bowls, allowing each person to enjoy their own beautifully garnished portion.
    • Garnish Abundantly: The garnishes are not just for aesthetics; they add crucial texture, crunch, and fresh flavors. Don’t be shy with the walnuts, pistachios, pomegranate, and cinnamon.
    • Temperature Versatility: While delicious warm, Ashure is equally delightful when chilled. It can be a refreshing dessert on a hot day or a comforting treat in cooler weather.
    • With Turkish Coffee: For a truly authentic experience, serve Ashure alongside a small cup of strong Turkish coffee.

    Variations & Add-Ins

    • Spice It Up: A pinch of ground cloves or allspice can be added with the cinnamon for a deeper spice profile.
    • Different Dried Fruits: Experiment with other dried fruits like dried cranberries, currants, or chopped dates. Be mindful of their sweetness levels.
    • Nutty Additions: Toasted hazelnuts or almonds can be added to the garnish for extra crunch and flavor.
    • Citrus Boost: A few drops of pure orange extract can intensify the orange flavor if desired.
    • Sweeteners: While sugar is traditional, some recipes use grape molasses (pekmez) for a different kind of sweetness and darker color.

    Prep Time: 15 minutes (active, plus overnight soaking) | Cook Time: 1 hour 50 minutes | Total Time: 2 hours 5 minutes | Serves: 8-10

    FAQs

    Can I make Ashure ahead of time?
    Absolutely! Ashure is a fantastic make-ahead dessert. Its flavors deepen over time, and it can be stored in the refrigerator for up to 3-4 days. Garnish right before serving.
    What is the significance of Noah’s Pudding?
    Ashure is deeply symbolic, especially in Turkish culture, often associated with the 10th day of the Islamic month of Muharram. It’s believed to represent the dish Noah prepared with all the remaining ingredients on his ark after the flood subsided.
    Can I use canned chickpeas and beans?
    Yes, you can. If using canned, rinse them very thoroughly to remove excess sodium and preservatives. You’ll need about 2 cans (15 oz each) of chickpeas and 2 cans of great northern beans. This will significantly reduce cooking time but may alter the final texture slightly.
    What are good substitutes for rose or orange blossom water?
    If you don’t have these, you can omit them entirely, or for a different aromatic twist, add a tiny splash of vanilla extract or an extra grating of orange zest.
    How do I know when the pudding is thick enough?
    The pudding should reach a creamy, porridge-like consistency, similar to a rice pudding. It will thicken further as it cools. When stirring, it should coat the back of a spoon and leave a clear trail if you run your finger through it.
    Is Ashure typically served warm or cold?
    Ashure is versatile and can be enjoyed warm, at room temperature, or chilled. Many prefer it chilled, as the flavors meld beautifully and it becomes a refreshing dessert.
    How can I store leftover Ashure?
    Store any leftover Ashure in an airtight container in the refrigerator for up to 3-4 days. It may thicken further, so you might need to stir in a little milk or water when reheating, if desired.

    [redirect_script url=”aHR0cHM6Ly9lYXN5ZGFzaHJlY2lwZXMuY29tL25vYWgtcy1wdWRkaW5nLXJlY2lwZS10dXJraXNoLWFzaHVyZS8/dXRtX3NvdXJjZT1waW50ZXJlc3QuY29tJnV0bV9tZWRpdW09cmVmZXJyYWw=”]